


The Best B2C Website Design Examples to Inspire
June 20, 2024
Stunning Aesthetic Website Design Examples
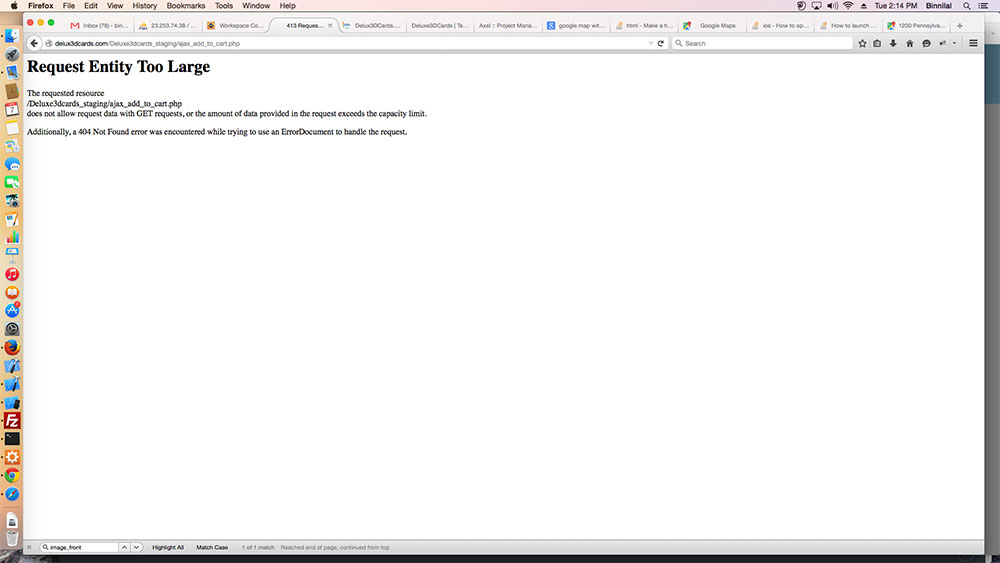
June 24, 2024Navigating the digital landscape, you’ve likely encountered the HTTP 413 error: “Request Entity Too Large.” This disruptive message indicates the server is rejecting your file upload due to exceeding size limits—a common yet frustrating barrier for web administrators.
Imagine the moment: you’re set to upload crucial content, only to stumble upon this roadblock. But don’t worry, increasing the upload file size limit and tweaking some settings can solve this. By understanding the underlying causes and applying the right fixes, we can prevent server issues and ensure a seamless uploading process.
This article will unravel the solutions, guiding you on how to fix this HTTP 413 error across various server environments like Nginx, Apache, and IIS. By the end, you'll be adept at modifying server configurations and adjusting directives such as client_max_body_size and upload_max_filesize. Ready to dive in? Let’s configure your server for smoother operations.
What Does This Error Mean?
Generally, web hosting companies configure their servers based on how many websites they host on a single shared server. The more websites they host, the more resources are consumed. This means that the size of uploads has to be restricted to keep all users of the server happy.
The 413 Request Entity Too Large error appears whenever the server cannot process the entire file in a single HTTP request, due to restrictions set by your web host. When you make a request that doesn’t meet the size limit, the 413 response will pop up.
Setting an upper limit is a normal and recommended practice to keep the server up and running, without consuming all of its resources. Although your particular web host may prevent you from changing the limit, most hosts do allow you to change it manually.
The following section will present a few methods to fix the Request Entity Too Large error.
How to Fix "Request Entity Too Large" Errors?
You can try a few of the solutions listed here and see if you can alter the HTTP request size allowance. If you don’t want to run these steps on your own, you can always contact your web hosting company and let them handle the issue instead.
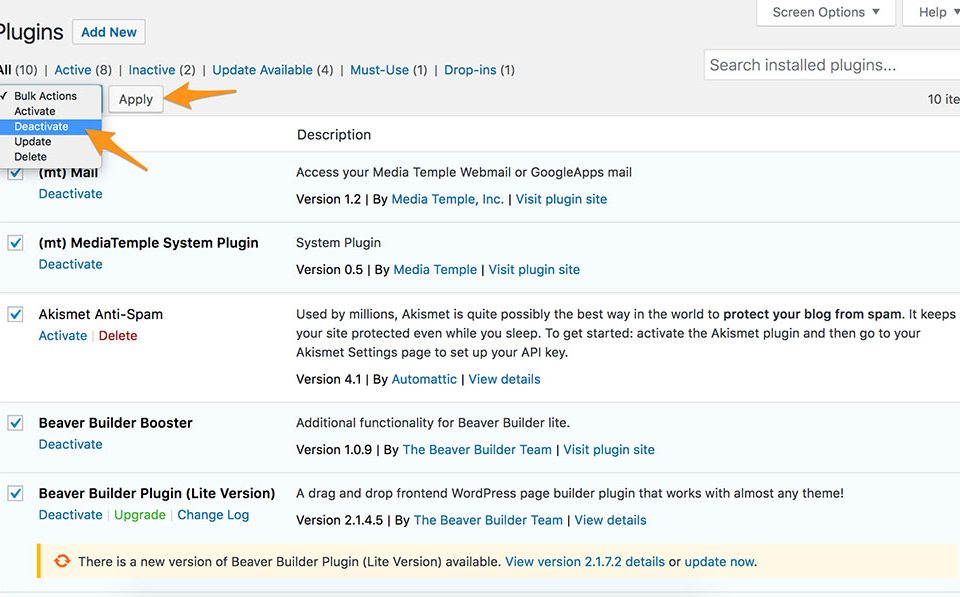
Change the functions.php File
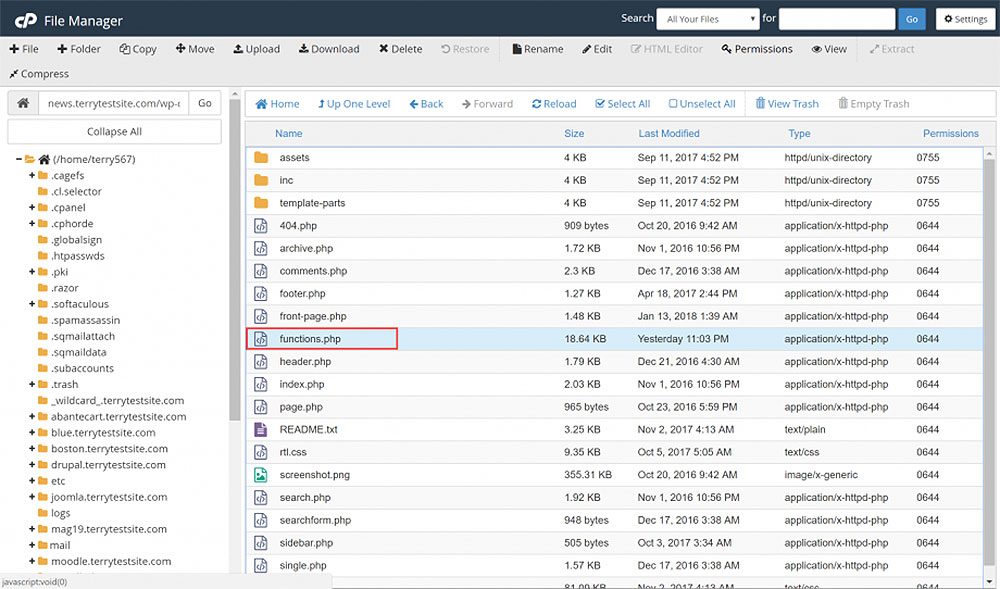
The first option is modifying the functions.php file. This file is located in your WordPress Themes folder. The file is responsible for defining classes and actions on a WordPress website.
Simply put, it is the file behind features such as enabling thumbnails, changing post formats, and setting up navigation menus. To modify this file, you need to:
1. Log in to your cPanel account and navigate to File Manager
2. Open the public_html directory
3. Find the folder named “wp-content”
4. Open the folder and look for Themes
5. In the Themes folder, look for the name of your active theme
6. Open your active theme folder and search for the functions.php file
7. Once you found it, right-click the file and select edit
8. When the dialog boxopens up, paste this code:
@ini_set( 'upload_max_size' , '64M' );
@ini_set( 'post_max_size', '64M');
@ini_set( 'max_execution_time', '300' )
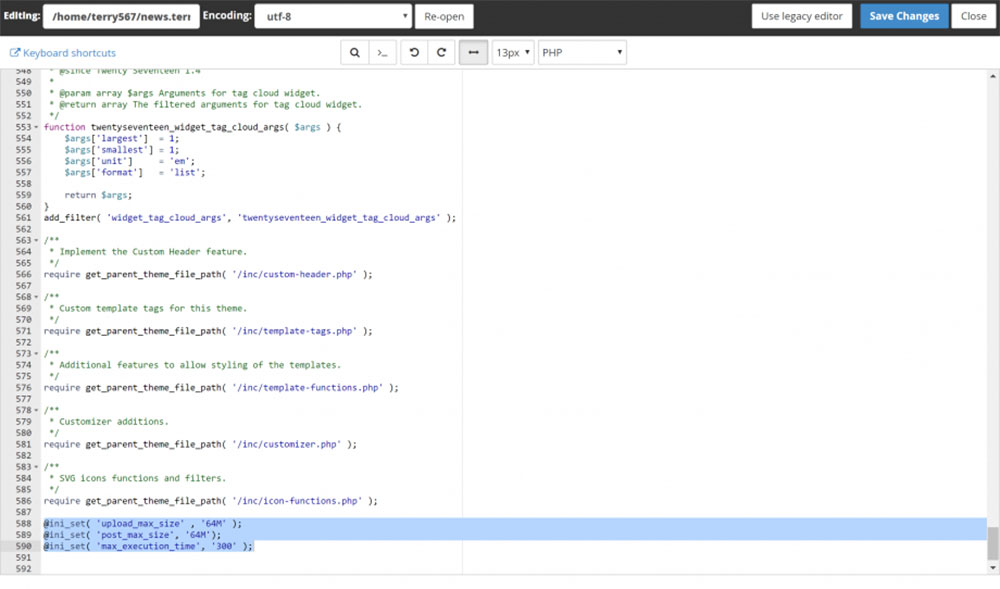
The code above will increase the maximum upload size to 64M, as well as increase the execution timeout value (some servers can take a long time to process large uploads).
Depending on what types of files you are trying to upload, you can increase it even more, to 128M. To do so, simply replace 64 with 128.
9. Save the changes and reload your website
Note that you can also add this code to functions.php through your WordPress admin dashboard with the theme file editor. This is not recommended, though, as a small mistake may break your site and you won’t be able to access the admin area to revert the change.
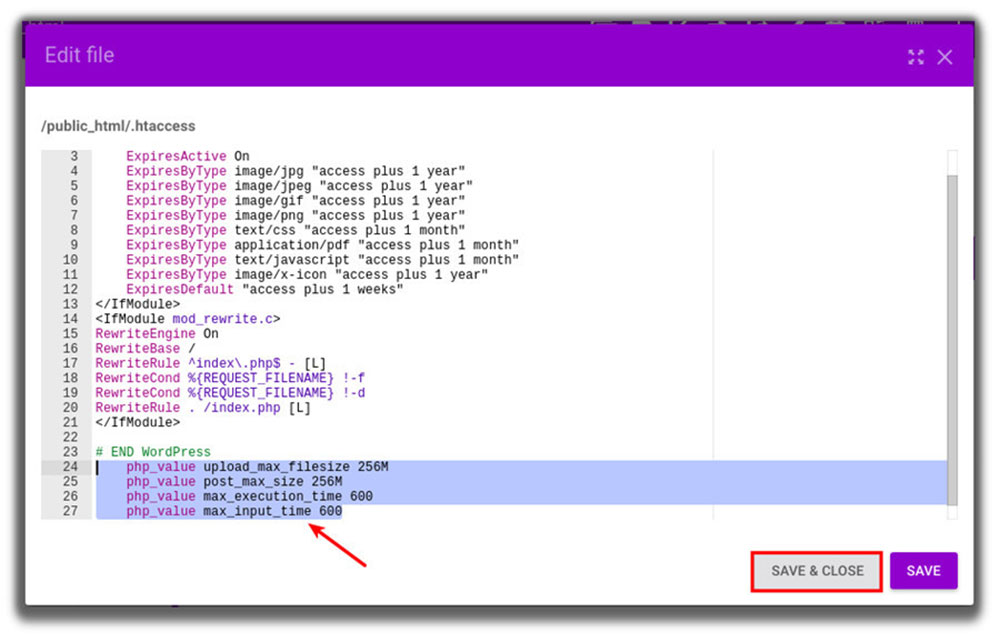
Change the .htaccess File
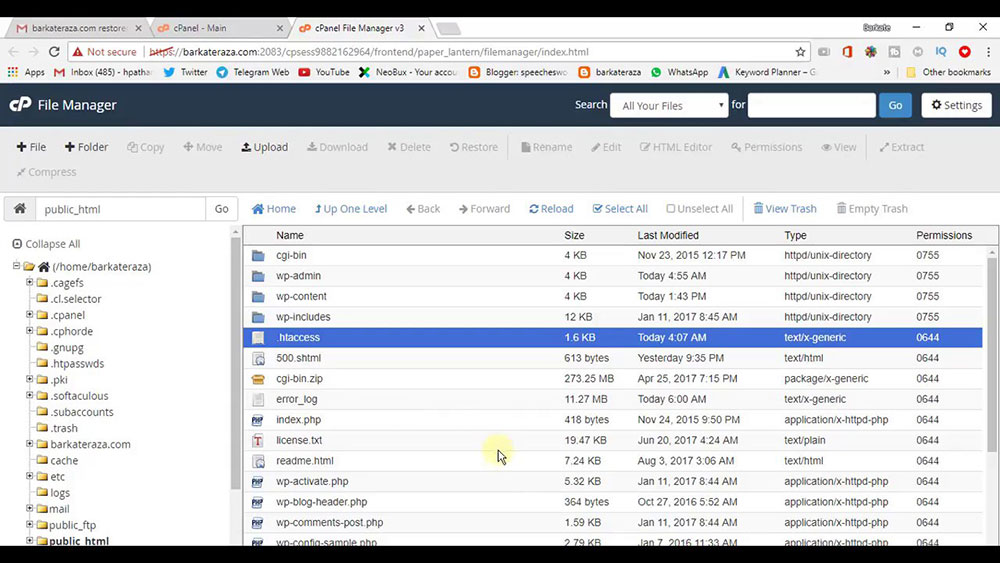
Another solution would be to change the .htaccess file, which is probably the most important file of a WordPress site. This file is responsible for configuring access to all the files and folders of the site itself. You will have to be careful when editing it.
Follow these steps with care:
1. Log in to your WordPress Dashboard
2. Find the public_html directory corresponding to your website’s domain (in case you own more than one website)
3. Open the directory and look for the .htaccess file. You can edit it by right-clicking it.
4. You will be asked to disable encoding – click Edit
5. The new tab that appears will let you edit the .htaccess file. This is where you need to paste the following lines:
php_valueupload_max_filesize64M
php_valuepost_max_size64M
php_valuemax_execution_time 300
php_valuemax_input_time 300
6. Save the changes and refresh your website
Change the Nginx Configuration
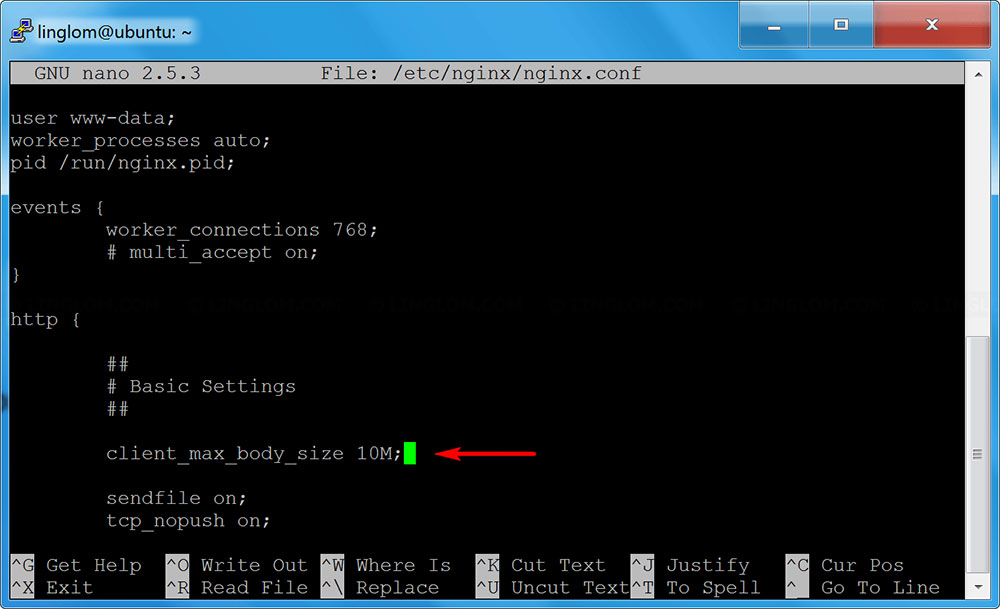
On WordPress sites that use Nginx instead of Apache, there is a directive called “client_max_body_size”, which is responsible for the maximum HTTP request size– the main cause of the 413 Request Entity Too Large response.
This directive is defined in the file called nginx.conf. You can find this file at /etc/nginx/nginx.conf.
Keep in mind that you’ll need to initiate an SSH console connection with your server to perform this method completely, which may not be available on shared hosting. In which case, you’ll have to contact your hosting company.
You will need these lines of code to modify the size:
# set client body size to 8M #
client_max_body_size8M;
The default value is 1M, and these lines of code change it to 8M. To set no request limit at all, you can set the value to 0. After making the changes, save the file and reload Nginx on your SSH or VNC console with this command:
# servicenginx reload #
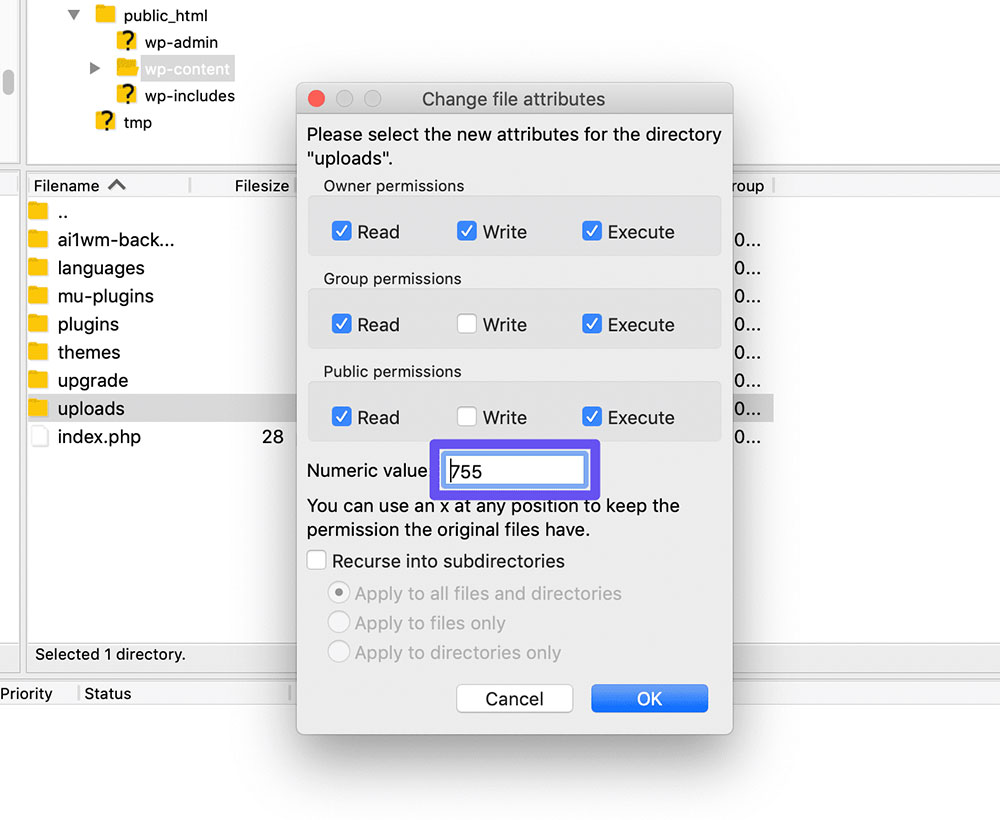
Extra Tip: Upload the File Using FTP
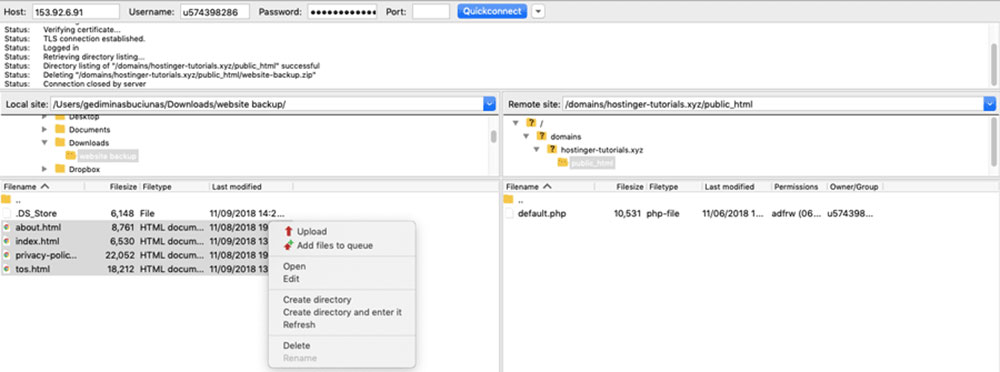
If none of the options listed above worked and Request Entity Too Large continues to occur, then you might want to try uploading your file via an FTP client. FTP stands for File Transfer Protocol and it is a program that lets you transfer/upload files from your computer to your website.
To use an FTP client, follow these steps:
1. Load your preferred client (e.g. FileZilla) and connect to your server
2. Navigate to the public_html directory
3. Go to Plugins/Themes
4. Open any of these folders, based on what you need to upload
5. Unzip the contents of the plugin or theme that you want to upload and go to the appropriate location in your FTP client
6. Locate the folder and drag and drop it where you want it to be
7. Save the changes and you’re done
FAQ on fixing the request entity too large error
What is the "Request Entity Too Large" error?
The HTTP 413 status code means the server can't process the request because the payload size exceeds its limits. This could happen if you are uploading files larger than what the server can handle, requiring configuration changes.
How do I fix the "Request Entity Too Large" error in Nginx?
In Nginx, adjust the **client_max_body_size** directive in the nginx.conf file. Set the value high enough to accommodate your needs. For example:
client_max_body_size 50M;
Restart the server to apply the changes.
How to fix it in Apache?
Edit the httpd.conf or .htaccess file and configure **LimitRequestBody** directive. Set an appropriate byte limit:
LimitRequestBody 52428800
Reload the Apache server to activate the updated settings.
Can I configure this error on IIS?
Yes. Go to the IIS manager and change the **maxAllowedContentLength** setting in the **web.config** file:
<configuration>
  <system.webServer>
    <security>
      <requestFiltering>
        <requestLimits maxAllowedContentLength="52428800" />
      </requestFiltering>
    </security>
  </system.webServer>
</configuration>
What is the role of php.ini in fixing this?
In php.ini, adjust the **upload_max_filesize** and **post_max_size** directives to larger values. For instance:
upload_max_filesize = 50M
post_max_size = 50M
Restart your web server to apply these changes.
Do server-side configurations contribute to this error?
Yes, server configurations directly limit file upload sizes. Settings like **client_max_body_size** in Nginx and **LimitRequestBody** in Apache can prevent larger uploads, necessitating these adjustments.
Can this error be caused by client settings?
Rarely. It's predominantly a server-side issue. However, client-side settings like browser upload limits can sometimes contribute but modifying server configurations usually resolves it.
How to identify the exact cause of the "Request Entity Too Large" error?
Check server logs. Logs in Apache, Nginx, or IIS will provide insight into which specific directive needs updating. Look for HTTP 413 status codes to pinpoint issues.
Will modifying these settings impact server performance?
Generally, no. Adjusting upload limits like client_max_body_size and upload_max_filesize shouldn't impact performance unless set excessively high, potentially consuming more memory.
Are there security risks involved in changing these limits?
Slightly. Increasing limits too much can expose your web server to Denial of Service (DoS) attacks. Ensure only trusted users can upload large files to mitigate risks.
Conclusion
Streamlining the myriad of server configurations can be daunting, but knowing how to fix the request entity too large error ensures a smooth, seamless operation. Addressing the HTTP 413 status code isn’t just about tweaking numbers; it’s about ensuring user satisfaction, security, and performance continuity.
We've explored modifications across Nginx with the client_max_body_size directive, Apache through LimitRequestBody, and IIS via maxAllowedContentLength. Adjusting php.ini for upload_max_filesize and post_max_size further enhances file upload capabilities.
Server-side configurations like these can solve restrictive upload conditions, enabling robust file transfers without the dreaded request entity too large error. Always remain vigilant about your upload settings to maintain an optimized, user-friendly web environment.
In your journey to better server management, understanding these tweaks not only solves immediate issues but lays down a foundation for future-proofing site performance.


