

Protected: Custom website design vs. template: which is best for your business in 2026?
April 8, 2026Protected: Why use WooCommerce? The top benefits for small to medium businesses
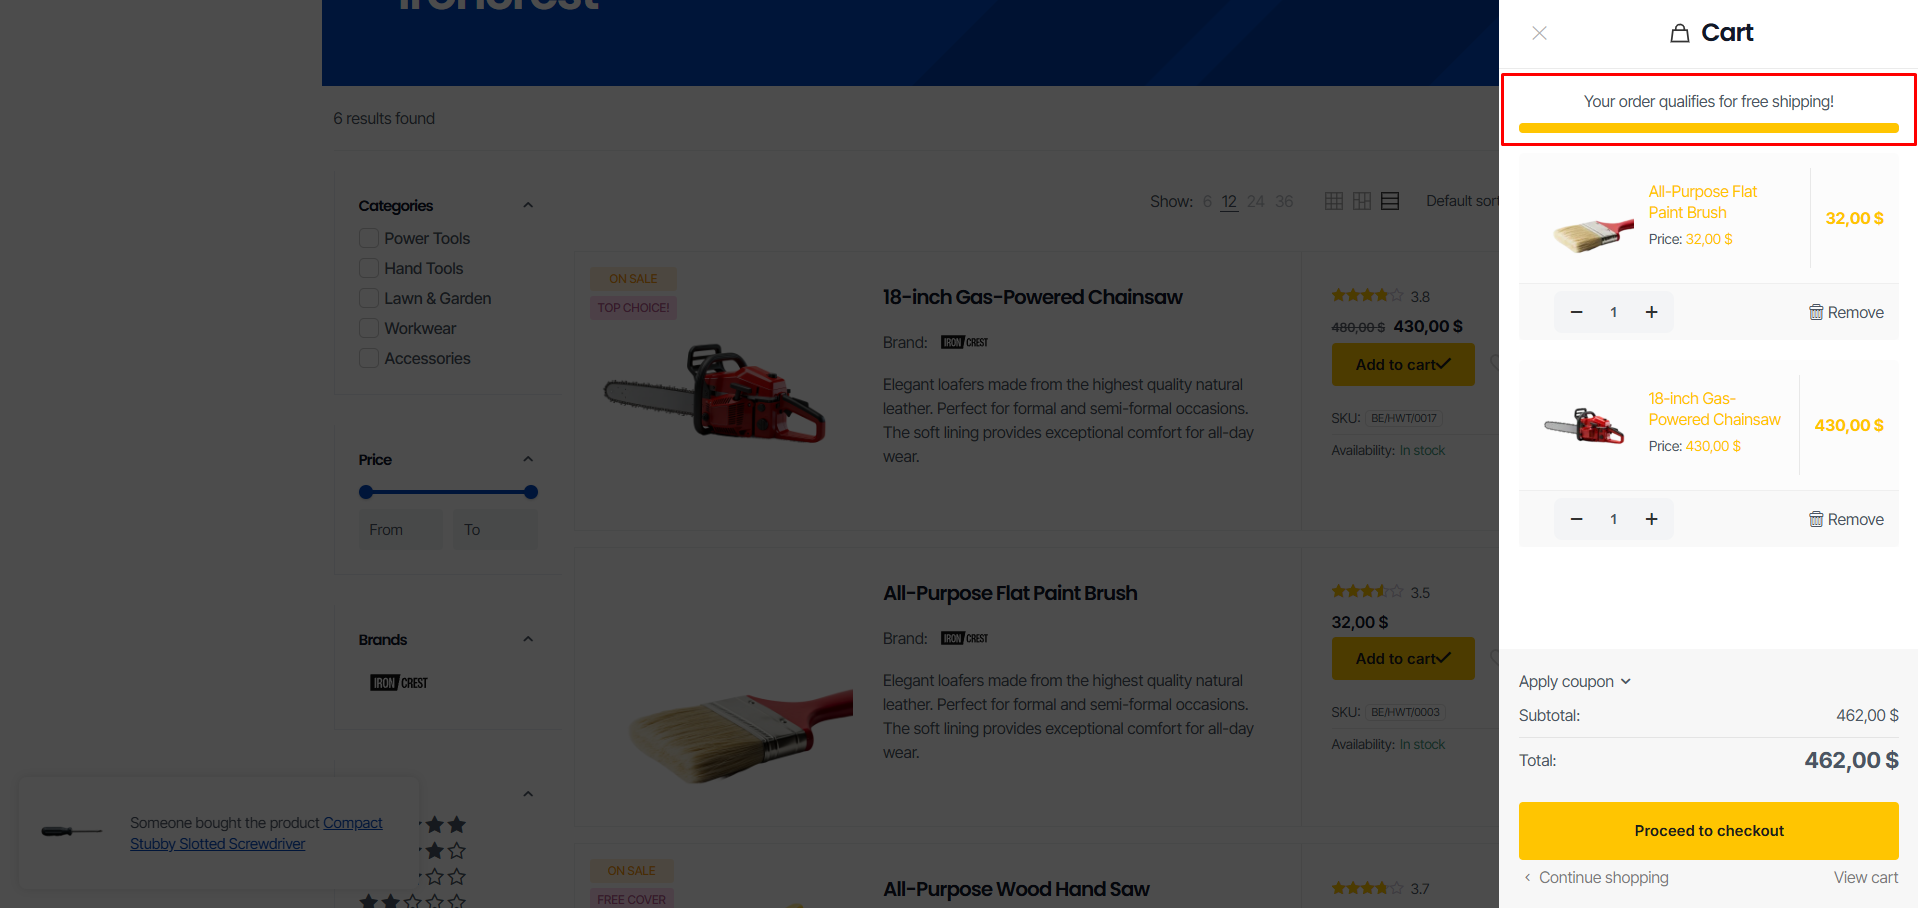
April 9, 2026Free Shipping in WooCommerce: Drive Higher Sales with a Progress Bar

In today’s e-commerce landscape, free shipping is a massive marketing lever. For many customers, it is actually more important than the price of the product itself. The stats don’t lie: unexpected costs tacked on at the end of the checkout process—specifically shipping fees—are the number one reason for shopping cart abandonment. That’s why Free Delivery Progress Bar is so important to achieve better sales.
The Psychology of the “Magic Zero”
Customers react to the word “Free” in a completely different way than they do to “Save $10,” even if the bottom line is exactly the same for your business. Let’s look at a real-world example:
A product priced at $125 + $10 shipping is almost always perceived as more expensive than the exact same product priced at $135 with free shipping.
Free shipping eliminates what we call the “pain of paying” for a service the customer doesn’t actually “see”—the logistics. By removing this friction, you keep the customer’s focus entirely on the value of the product.
The Most Popular Free Shipping Strategies
| Strategy | How it Works | Why it’s a Win |
|---|---|---|
| Minimum Threshold | Free shipping kicks in after a specific spend (e.g., $50+). | Boosts AOV. Customers will grab a “filler” item just to hit the goal. |
| Always Free | Shipping costs are baked into the product price. | Perfect for premium brands. Builds an “all-inclusive” image. |
| Limited-Time Promo | “Free shipping this weekend only!” | Triggers FOMO and creates an immediate spike in sales volume. |
| Loyalty/Coupons | The “Amazon Prime” model or newsletter perks. Client pays for one year subscription or enter a coupon code from newsletter | Builds long-term loyalty. Customers stop price-shopping elsewhere. |
How to Calculate Your Free Shipping Threshold
Setting your threshold by just “eye-balling it” is a major mistake. You need to find the sweet spot between customer satisfaction and protecting your margins. Remember: your store is here to turn a profit, not just hand out freebies.
The Rule of Thumb: Check your current Average Order Value (AOV). Your free shipping threshold should be about 10–20% higher than your current average.
The Math: If your customers spend an average of $150, set your threshold at $199. This provides the necessary motivation for them to add another item to their cart, which effectively covers your shipping costs.
Pros & Cons: An Expert’s Take at Free Delivery Progress Bar
Pros:
- Slash Abandonment: Customers don’t feel “blindsided” by fees at the final stage.
- Bigger Carts: The drive to “unlock” free shipping works on almost everyone.
- Competitive Edge: Between two identical offers, the one with “Free Shipping” wins every time.
Cons:
- Margin Compression: You’re eating the shipping cost, which reduces your net profit per item.
- The Return Dilemma: If a customer returns an item, you often lose the original shipping cost (depending on your local laws and policy).).
When a Free Delivery Progress Bar Can Backfire?
A progress bar is a powerhouse tool, but avoid these common traps:
- Unreachable Goals: If your average price is $50 but free shipping starts at $500, you’ll frustrate customers instead of motivating them.
- UX Glitches: If the bar doesn’t update in real-time when an item is added, it loses its psychological impact.
- Visual Overload: If your side cart is already cluttered with too many promos, the bar gets lost in the noise.
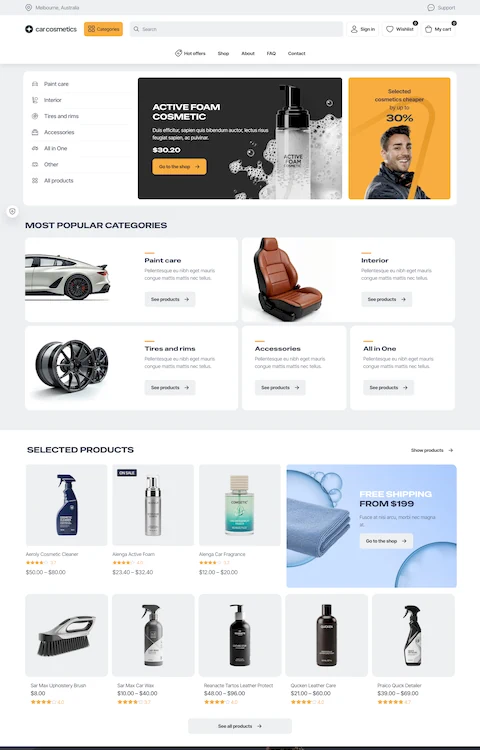
Tutorial: Launching Your Free Delivery Progress Bar (WooCommerce + BeTheme)
I’m going to give you a high-level walkthrough on how to get your Free Delivery Progress Bar up and running using WordPress, WooCommerce, and the BeTheme template.
1. Configuring WooCommerce
Configuring shipping in WooCommerce is one of those moments where you’ll either feel like a logistics guru or… honestly, just a little lost in a sea of tabs. Don’t sweat it—I’m going to walk you through this step-by-step so your customers can enjoy their shopping experience (and that free shipping they’re craving).
I’m assuming you already have the WooCommerce plugin installed and your store is live, and you’re just looking to level up its functionality.
Before we trigger the Free Delivery Progress Bar on the front end, we need to properly set up your Shipping Zones and define the conditions for free delivery.
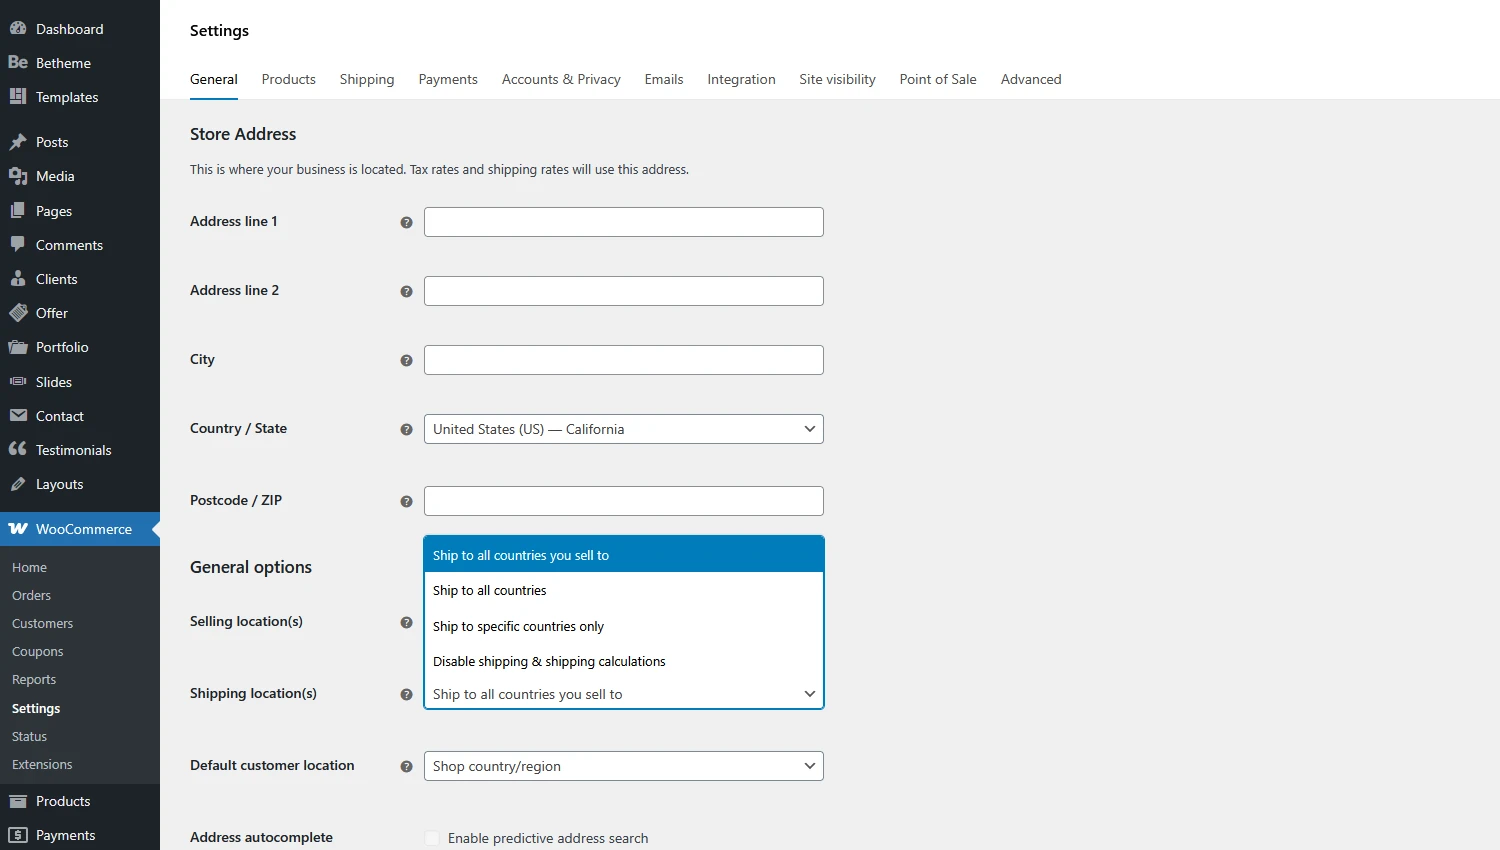
WooCommerce Basic Setup
To start, head over to WooCommerce -> Settings -> General and ensure your Shipping location(s) are defined. If you make any tweaks, be sure to hit the Save changes button at the bottom.
Add a Shipping zone
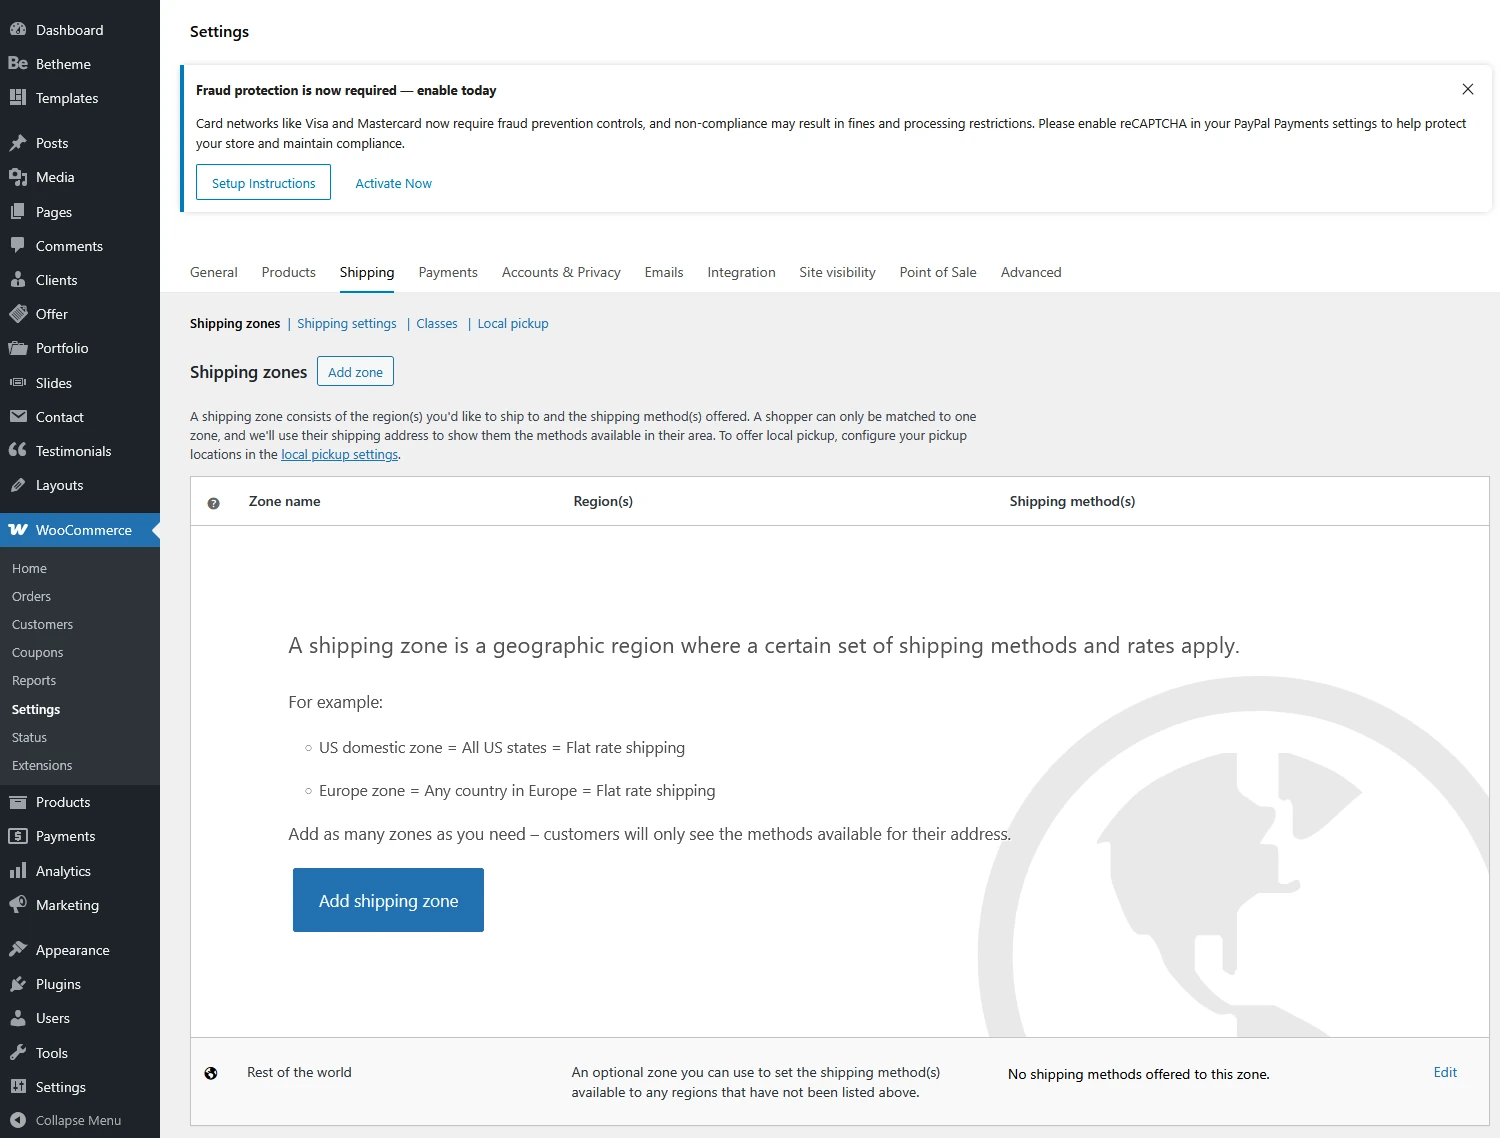
Follow these instructions to add your first Shipping Zone
- Navigate to Shipping -> Shipping zones and click Add shipping zone
- Zone Name: Give your zone a clear name in the Zone name field (e.g., California – Free Shipping).
- Zone Regions: Define the areas where this zone will apply. You can get as granular as you want—selecting specific countries, states, provinces, or even entire continents.
- Shipping Methods: Click the Add shipping method button. You’ll be presented with three choices:
- Free shipping: (This is the one we’re after!)
- Flat rate: A fixed shipping fee for any order.
- Local pickup: Allows the customer to collect the items from your warehouse or storefront themselves.
- Once you’ve added Free shipping, you need to set the requirements. Under the settings for this method, you can choose from:
- No requirement
- A valid free shipping coupon
- A minimum order amount
- A minimum order amount OR coupon
- A minimum order amount AND coupon
- Select A minimum order amount and enter your threshold (e.g., $120). In this step, you can also toggle whether free shipping is calculated based on the pre-discount order amount and configure any specific shipping class costs if necessary.
2. Configuring BeTheme
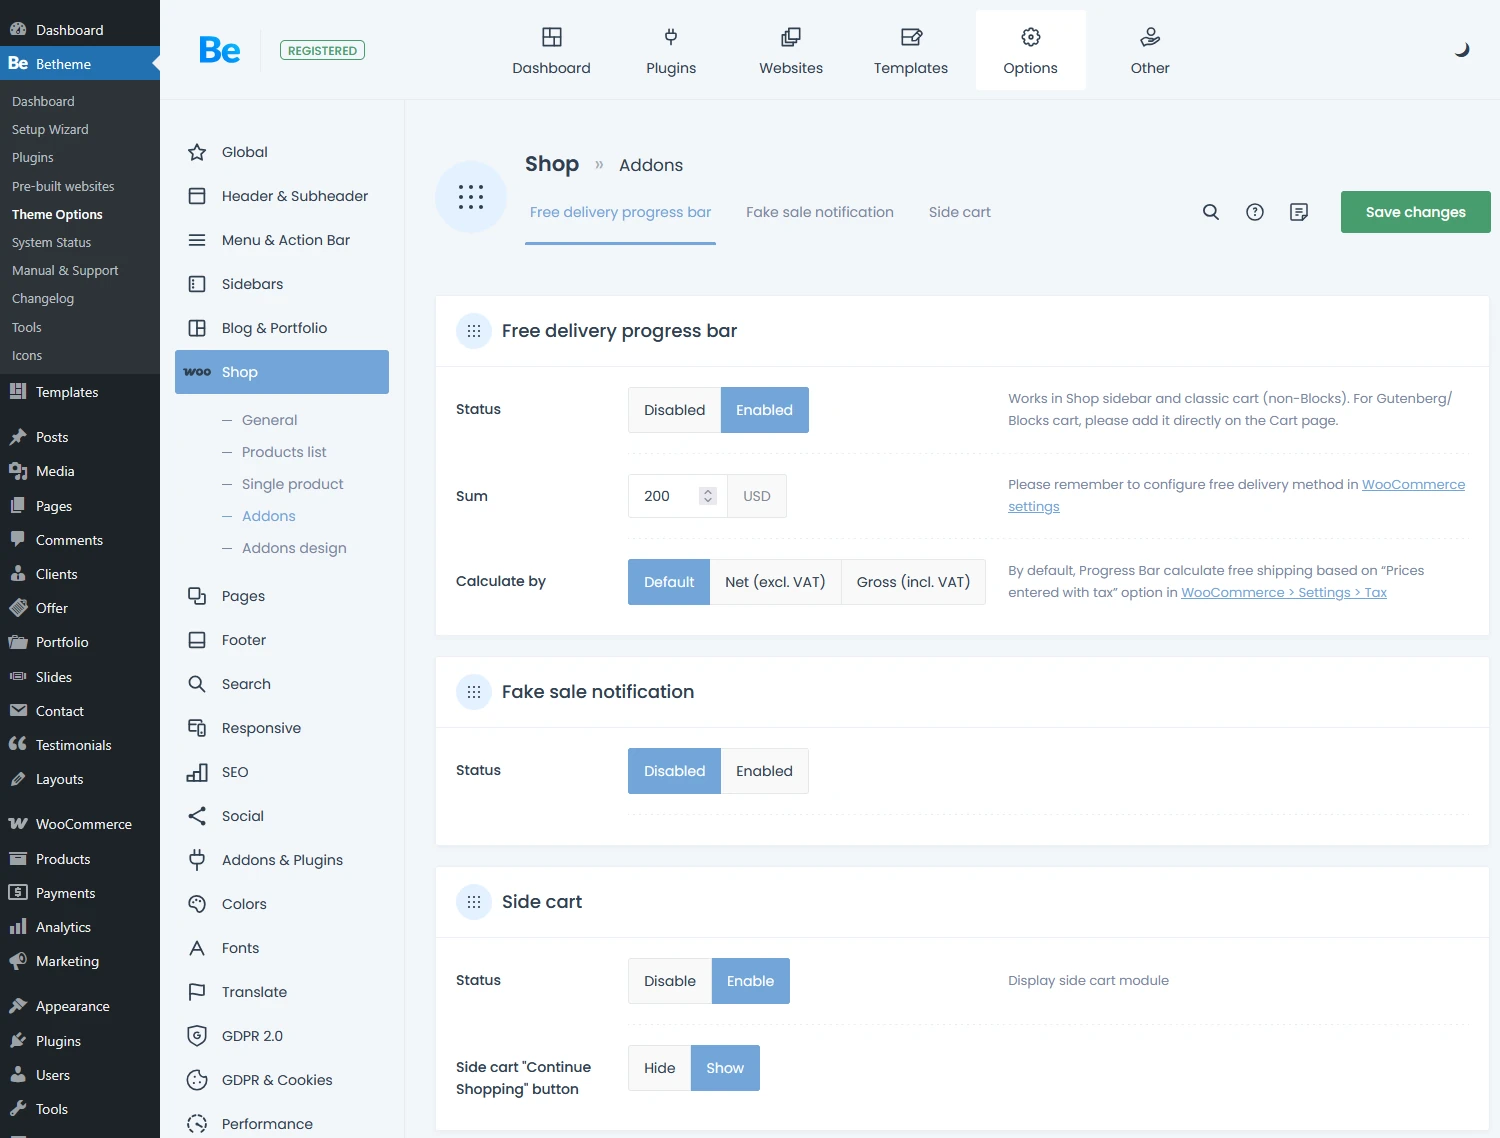
Now that WooCommerce is squared away, it’s time to trigger the Progress Bar within your theme. Just follow these steps:
- Navigate to BeTheme -> Theme Options.
- Open the Shop -> Addons tab.
- Switch the Free delivery progress bar status to Enabled.
- In the Sum field, enter the exact same value you used for your Minimum order amount in WooCommerce.
- If you want to match the bar to your brand’s aesthetic, head over to Shop -> Addons Design. There, you can fully customize the colors, including:
- Active bar color
- Inactive bar color
- “Eligible for free delivery” bar color
That’s it! Your Free Delivery Progress Bar should now be live and visible in both your standard cart and your side cart.
If you haven’t enabled a side cart yet, I highly recommend doing so—it’s a total game-changer for the customer experience. You can follow our quick guide here: The WooCommerce Sliding Cart: How to Set It Up Fast? (Guide).