


The Best WordPress Themes for Consultants
May 1, 2026
Why use WooCommerce? The top benefits for small to medium businesses
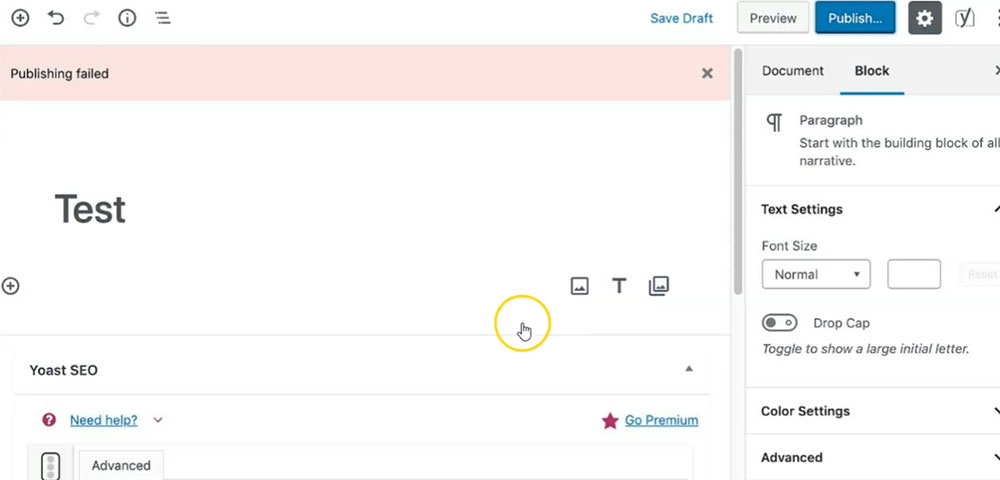
May 6, 2026You hit publish. Nothing happens. A red banner appears: "Publishing failed. Your change may not have been saved."
If you're trying to fix the WordPress publishing failed error, you're not alone. It's one of the most common Gutenberg block editor issues, and it almost always comes down to the WordPress REST API being blocked, misconfigured, or interrupted.
This guide covers every confirmed cause and fix, including security plugin conflicts, SSL misconfigurations, .htaccess corruption, Nginx server issues, and user permission failures.
By the end, you'll know exactly which fix applies to your site.
What Is the WordPress Publishing Failed Error?
The WordPress publishing failed error is a client-server communication breakdown that occurs when the Gutenberg block editor cannot reach the WordPress REST API. The editor sends a REST API request to publish the post. When that request fails, WordPress returns a red banner reading: "Publishing failed. Your change may not have been saved. Please try again later."
This error was introduced with Gutenberg in WordPress 5.0 (released December 2018). It does not occur in the Classic Editor because the Classic Editor uses a standard form submission instead of a REST API call.
The WordPress REST API communicates via JSON objects. When the REST API returns an error instead of a valid JSON response, the Gutenberg block editor triggers the publishing failed error and the post save fails completely.
| Error Type | Editor | Trigger | HTTP Response |
|---|---|---|---|
| Publishing failed | Gutenberg block editor | REST API request fails | 401, 403, or 404 |
| Updating failed | Gutenberg block editor | REST API update request fails | 401, 403, or 404 |
| Save error | Classic Editor | Form submission fails | 500 or timeout |
WordPress powers 43.5% of all websites as of August 2024, giving it a 61.7% share of the CMS market (Kinsta, 2024). With that scale, even a niche error like this affects millions of sites.
What Causes the WordPress Publishing Failed Error?
The WordPress block editor publishing failed error has 7 confirmed root causes. Identifying the correct one before applying a fix saves significant time.
Checking yoursite.com/wp-json/ first is the fastest way to narrow down the cause. A valid JSON response means the REST API is working. An error page means it is blocked or broken.
| Root Cause | HTTP Status | Most Common Source |
|---|---|---|
| REST API blocked | 401, 403, or 404 | Security plugin firewall rule |
| WordPress URL mismatch | 401 or redirect loop | Settings > General misconfiguration |
| Plugin or theme conflict | varies | Caching plugins, page builders |
| SSL/HTTPS misconfiguration | mixed content or redirect loop | Incomplete HTTP to HTTPS migration |
| Corrupted .htaccess | 404 on /wp-json/ | Failed plugin update, manual edit |
| User permission/nonce failure | 403 | Expired session, wrong user role |
| Nginx misconfiguration | 404 on /wp-json/ | Missing try\_files directive |
Security plugins that block REST API endpoints break Gutenberg, WooCommerce, and any plugin that uses the REST API (DEV Community, 2024). This is the single most common cause of the WordPress publishing failed error in production environments.
How to Check If the REST API Is Blocked?
The fastest diagnostic: navigate to yoursite.com/wp-json/ in your browser. A page displaying valid JSON confirms the REST API is working. An error page, a login prompt, or an empty response confirms it is blocked.
WordPress Site Health provides a second check. Go to Tools > Site Health > Info, scroll to REST API, and look for a pass or fail status. A fail here confirms the block before you touch any settings.
For a more precise diagnosis, open your browser's developer tools (F12), go to the Network tab, and attempt to publish a post. Filter by /wp-json/ requests and check the HTTP status code returned. The status code tells you exactly which fix to apply:
- 401: authentication or nonce failure
- 403: security plugin or permission block
- 404: routing failure, corrupted .htaccess, or Nginx misconfiguration
You can also test the REST API directly using curl: curl -I https://yoursite.com/wp-json/. A 200 response is clean. Anything else points to the specific fix you need.
How to Fix the REST API Being Blocked by a Security Plugin?
Security plugins are the most common cause of the WordPress REST API being blocked. Wordfence, iThemes Security, and All-In-One WP Security all include settings that can restrict or completely disable REST API access for unauthenticated requests, and those settings frequently affect authenticated editor sessions too.
Temporarily deactivating the security plugin and retesting /wp-json/ confirms whether it is the cause before you adjust any settings.
Fixing Wordfence REST API Blocking
Wordfence does not have a direct "block REST API" toggle, but its firewall rules can trigger 403 responses on REST API requests. Check Wordfence > Firewall > Blocking for any rules targeting /wp-json/ patterns.
If the REST API is being blocked by a Wordfence firewall rule, add your own domain to the whitelist under Wordfence > Firewall > Whitelist IPs. Confirm the fix by reloading /wp-json/ and retesting a publish.
Fixing iThemes Security REST API Restrictions
iThemes Security has a direct REST API restriction setting. Go to Security > Settings > WordPress Tweaks and look for "Disable REST API." The setting has 3 options:
- Default Access (do not restrict)
- Restricted Access (logged-in users only)
- No Access (completely disabled)
Change the setting to "Default Access" or "Restricted Access" and save. The "No Access" setting breaks the Gutenberg block editor completely because the editor itself requires the REST API to function.
Fixing All-In-One WP Security REST API Restrictions
All-In-One WP Security places its REST API controls under Miscellaneous in the plugin settings. Look for "Disable WordPress REST API" and uncheck this option.
After adjusting any security plugin setting, always retest the publish immediately. Some security plugins have layered rules where disabling one setting reveals a second restriction underneath.
How to Fix WordPress URL and Site Address Mismatches?
A WordPress Address (URL) and Site Address (URL) mismatch breaks REST API authentication token routing. The Gutenberg block editor sends REST API requests to the WordPress Address URL. If the Site Address differs, those requests return authentication errors or redirect loops that produce the WordPress post update failed message.
The most common mismatch: WordPress Address is set to https://yoursite.com but Site Address still reads http://yoursite.com after an HTTP to HTTPS migration. Go to Settings > General and confirm both fields match exactly, including the protocol.
Fixing via wp-config.php
If the Settings page itself is inaccessible, fix the URL mismatch directly in wp-config.php. Add these 2 lines above the "That's all, stop editing!" comment:
define('WP_HOME','https://yoursite.com');
define('WP_SITEURL','https://yoursite.com');
These lines override the database values completely. After confirming the fix, remove the lines from wp-config.php and update Settings > General permanently instead, as hardcoded values in wp-config.php make the Settings page fields uneditable.
Fixing via phpMyAdmin
phpMyAdmin fix steps:
- Open phpMyAdmin from your hosting control panel
- Select your WordPress database
- Open the
wp_optionstable - Find the rows where
option_name=siteurlandhome - Update both values to the correct URL
After any URL fix, go to Settings > Permalinks and click Save Changes without modifying anything. This flushes the permalink structure and regenerates the rewrite rules that the REST API depends on.
How to Fix the Publishing Failed Error Caused by Plugin or Theme Conflicts?
Plugin and theme conflicts cause the WordPress editor not responding error when a plugin or theme modifies, intercepts, or breaks REST API requests. Caching plugins are among the most frequent offenders. WP Super Cache and Autoptimize have both been documented as causing Gutenberg block editor failures when their REST API caching rules are misconfigured (Premium Blocks, 2024).
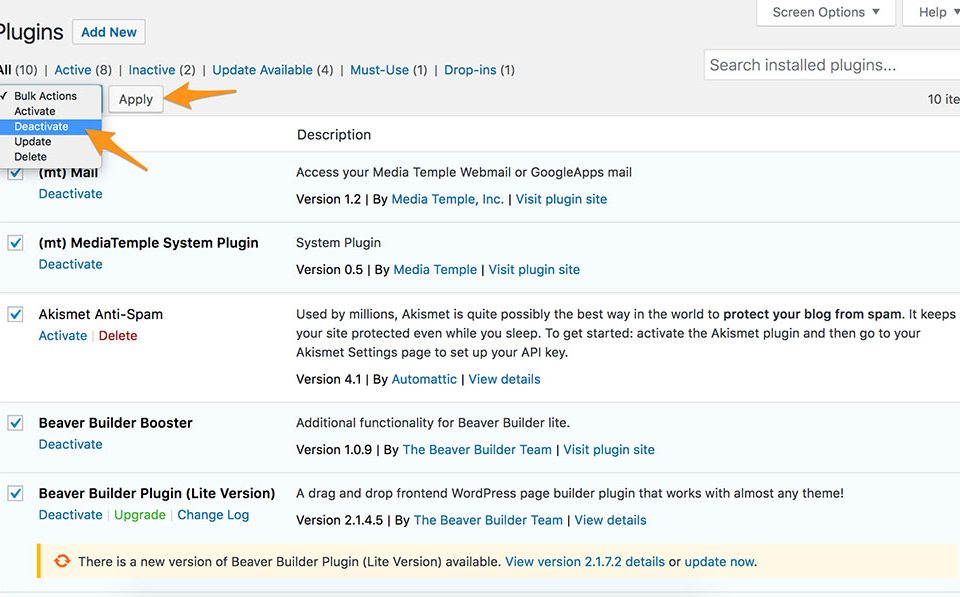
Fastest isolation method: deactivate all plugins except WordPress core, then attempt to publish. If publishing succeeds, a plugin is causing the conflict.
Plugin Conflict Isolation Steps
Reactivate plugins one at a time and test after each reactivation. The plugin that breaks publishing when reactivated is the conflict source. Document the plugin name before investigating further.
Common conflict sources by plugin type:
- Caching plugins (WP Rocket, W3 Total Cache): caching REST API responses breaks authentication nonces
- Page builders (Elementor, Divi): custom REST API modifications that conflict with Gutenberg
- Security plugins: firewall rules targeting REST API endpoints
- Optimization plugins (Autoptimize): script minification breaking the block editor JavaScript
For WP Rocket specifically, go to WP Rocket > Cache and add /wp-json/ to the "Never Cache URL(s)" list. W3 Total Cache has the same fix under Performance > Page Cache > Never cache the following pages. Adding /wp-json* to the exclusion list resolves the caching conflict without disabling the plugin entirely.
Theme Conflict Isolation
Switch to a default WordPress theme (Twenty Twenty-Four) to rule out theme-level conflicts. Custom themes that modify REST API behavior or load conflicting JavaScript libraries can trigger the same WordPress block editor not working error that plugin conflicts produce.
If switching to Twenty Twenty-Four resolves the publish error, check your active theme's functions.php for any code that hooks into rest_api_init or rest_authentication_errors and removes or restricts access.
How to Fix SSL and HTTPS Configuration Errors Causing Publishing Failures?
An HTTPS misconfiguration breaks the WordPress REST API request because the browser blocks insecure content on HTTPS pages. This produces a WordPress mixed content error that prevents the Gutenberg editor from completing its authentication handshake with the REST API endpoint.
According to a 2023 UX study cited by WP Troubleshoot, 68% of users abandon sites displaying "Not Secure" browser warnings. An SSL misconfiguration that breaks the REST API does not just cause the WordPress publishing failed error. It actively destroys user trust before anyone can even read the content.
Diagnosing the SSL Issue
Run the site through SSL Labs (ssllabs.com/ssltest/) to identify certificate errors, expired certificates, or incomplete certificate chains. An SSL Labs grade below B indicates a configuration issue serious enough to break REST API communication.
Check the browser console (F12 > Console) for mixed content warnings. They appear as lines starting with "Mixed Content: The page at 'https://..." followed by the insecure resource URL. Each warning is a specific resource that needs its URL updated from HTTP to HTTPS.
Fixing the Mixed Content Issue
Better Search Replace plugin steps:
- Install and activate Better Search Replace
- In the "Search for" field, enter:
http://yoursite.com - In the "Replace with" field, enter:
https://yoursite.com - Select all database tables
- Run as a dry run first, then confirm with a live run
After the database update, go to Settings > General and confirm both URL fields use https://. Then check .htaccess for any redirect rules that create an HTTP to HTTPS to HTTP loop. A redirect loop returns no valid response to the REST API request and produces the WordPress update failed error.
If the SSL certificate itself is expired or misconfigured, contact your hosting provider. Most managed WordPress hosts, including WP Engine and Kinsta, handle SSL renewals automatically. Shared hosting providers typically provide free SSL through Let's Encrypt with a one-click renewal from the cPanel SSL/TLS manager.
How to Fix a Corrupted .htaccess File Causing Publishing Failures?
A corrupted .htaccess file causes WordPress to misroute REST API requests, returning 404 errors on /wp-json/. The .htaccess file controls Apache server rewrite rules. When those rules break, the Gutenberg block editor cannot reach the REST API endpoint and the WordPress post update failed error appears.
The .htaccess file most commonly becomes corrupted after a failed plugin update, a manual edit gone wrong, or a security plugin that modifies the file and writes invalid syntax.
Diagnosing a Corrupted .htaccess File
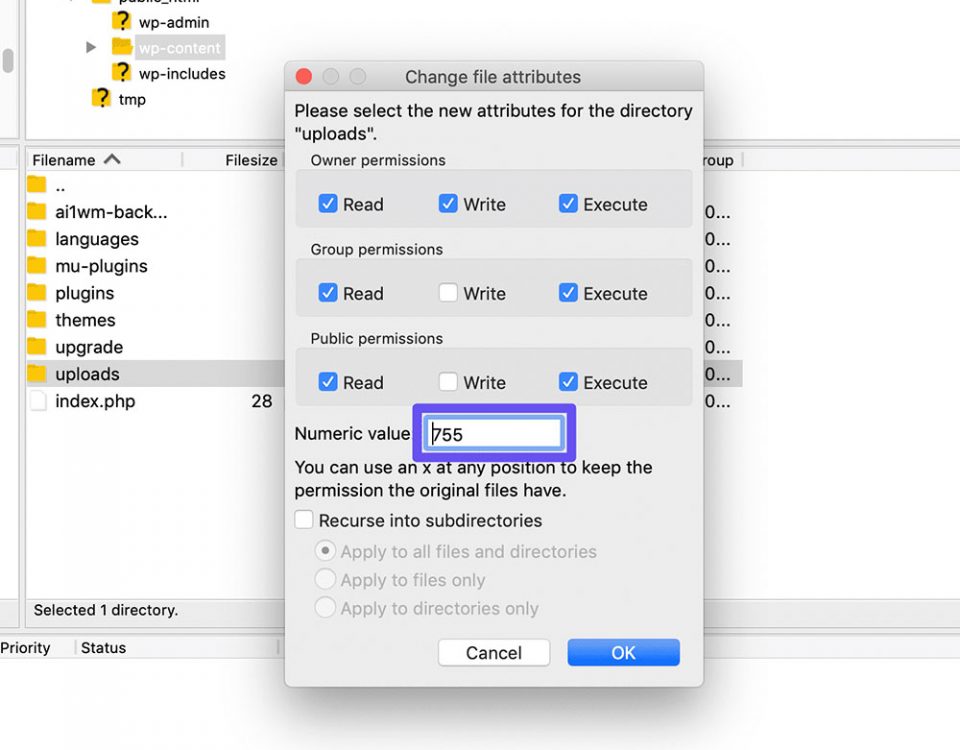
Quick test: rename the current .htaccess file to .htaccess_old via FTP or File Manager, then navigate to yoursite.com/wp-json/. WordPress will temporarily fall back to default routing. If the REST API responds with valid JSON after the rename, the .htaccess file was the cause.
Access .htaccess via FTP/SFTP (FileZilla works well here) or through the File Manager in cPanel. Always back up the current file before replacing it.
Replacing with Default WordPress .htaccess Rules
The default WordPress .htaccess rewrite block is:
# BEGIN WordPress

<IfModule mod_rewrite.c>
RewriteEngine On
RewriteBase /
RewriteRule ^index\.php$ - [L]
RewriteCond %{REQUEST_FILENAME} !-f
RewriteCond %{REQUEST_FILENAME} !-d
RewriteRule . /index.php [L]
</IfModule>

# END WordPress
Replace the entire file content with these rules. Nothing else should be between the BEGIN and END WordPress markers unless added by a specific plugin with a legitimate reason.
After replacing the file, go to Settings > Permalinks and click Save Changes. WordPress will regenerate the .htaccess file cleanly, and any plugin-specific rewrite rules will be re-added automatically on the next page load.
How to Fix Publishing Failures Caused by User Permission or Authentication Errors?
REST API requests require cookie-based authentication with a valid nonce. WordPress nonces expire after 24 hours by default (WordPress Developer Documentation). An expired nonce causes the editor to send an unauthenticated REST API request, which returns a 403 and triggers the WordPress publishing failed error even though the user is logged in.
First step: hard refresh the editor with Ctrl+Shift+R (Windows) or Cmd+Shift+R (Mac) to regenerate the nonce before retrying the publish. This resolves the error in the majority of nonce-related cases.
Checking User Role Permissions
| WordPress Role | Can Publish Posts? | REST API publish\_posts Capability |
|---|---|---|
| Administrator | Yes | Yes |
| Editor | Yes | Yes |
| Author | Yes (own posts) | Yes (own posts) |
| Contributor | No | No |
| Subscriber | No | No |
Go to Users > All Users and confirm the publishing user holds the Editor or Administrator role. Contributors cannot publish in WordPress by default. Their posts go to pending review, which the Gutenberg editor surfaces as the WordPress block editor failure red banner.
Fixing Role Management Plugin Conflicts
If a membership or role management plugin is active (Members plugin, User Role Editor), it may have stripped the publish_posts capability from the user role.
Check the plugin's capability settings for the affected role and restore publish_posts, edit_posts, and edit_published_posts.
Staging environments and password-protected sites introduce a second authentication layer. If the staging site uses HTTP Basic Auth at the server level, the REST API request from the Gutenberg editor hits the Basic Auth wall and returns a 401 before WordPress even processes the nonce. Whitelist the wp-admin IP or temporarily disable Basic Auth while testing.
How to Fix the Publishing Failed Error in Nginx Server Configurations?
Nginx does not use .htaccess. Rewrite rules live in the server block configuration file, typically at /etc/nginx/sites-available/yoursite. A missing try_files directive causes Nginx to return 404 on all /wp-json/ requests, producing the WordPress REST API 404 error that blocks publishing.
ModSecurity can also incorrectly block legitimate WordPress REST API requests on Nginx setups, treating the Gutenberg editor's JSON payloads as suspicious activity (WP Simple Pay, 2024). The server error log will show which specific ModSecurity rule triggered the block.
Adding the try\_files Directive
The fix: add this line to the location / block inside your server configuration:
location / {
try_files $uri $uri/ /index.php?$args;
}
Without this directive, Nginx looks for a physical file or directory matching the request path. When it finds neither (because /wp-json/ is a virtual endpoint, not a real folder), it returns a 404 instead of passing the request to WordPress via index.php.
After editing the Nginx config file, always test the syntax before restarting: sudo nginx -t. If the test passes, restart with sudo systemctl restart nginx. Skipping the syntax test and restarting a config with errors takes the entire server offline.
Fixing Nginx FastCGI Cache Conflicts
FastCGI cache configurations on Nginx can cache REST API responses, breaking authentication nonces on subsequent requests.
Exclude /wp-json/ from cache:
- Add
set $skip_cache 0;to your cache configuration block - Add a condition:
if ($request_uri ~* "/wp-json/") { set $skip_cache 1; } - Apply the skip:
fastcgi_cache_bypass $skip_cache;andfastcgi_no_cache $skip_cache;
Restart Nginx after the change. Test by reloading /wp-json/ and verifying a live, non-cached JSON response returns each time.
How to Fix the WordPress Publishing Failed Error When All Other Fixes Fail?
If the fixes in sections 4 through 9 have not resolved the WordPress block editor failure, 4 escalation steps cover the remaining causes: low PHP memory, corrupted core files, server-level firewall rules, and Classic Editor as a temporary workaround while the root cause is found.
Increase the WordPress Memory Limit
A low PHP memory limit causes incomplete REST API responses. WordPress recommends a minimum of 256MB for most sites, and 512MB for WooCommerce stores or sites running heavy page builders (Elementor, 2024).
Add this line to wp-config.php above the "That's all, stop editing!" comment:
define('WP_MEMORY_LIMIT', '256M');If the error persists after adding this line, your hosting provider has a hard memory cap overriding the wp-config.php value. Shared hosting plans frequently lock the PHP memory limit. Contact the host directly and request a limit increase to at least 256MB for your account. Some hosts raise this in under 5 minutes via live chat.
Enable WP\_DEBUG and Check the Error Log
The WordPress debug log catches PHP fatal errors occurring during REST API requests that produce no visible error message in the browser.
Add these 3 lines to wp-config.php:
define('WP_DEBUG', true);
define('WP_DEBUG_LOG', true);
define('WP_DEBUG_DISPLAY', false);
The debug log writes to /wp-content/debug.log. After adding the lines, attempt to publish a post, then open the log file via File Manager or FTP. Look for any PHP fatal error or warning that fires during the publish attempt. The error message in the log will name the exact plugin file or WordPress core file causing the problem (WisdmLabs, 2024).
Always disable WP\_DEBUG after troubleshooting. A live site with WP_DEBUG_DISPLAY set to true leaks PHP error messages to site visitors.
Contact Your Hosting Provider About Server Firewall Rules
Some shared hosting environments run aggressive ModSecurity rulesets that flag legitimate WordPress REST API JSON payloads as suspicious. ModSecurity can incorrectly block requests to the WordPress REST API, particularly when post content includes URLs or HTML (WP Simple Pay, 2024).
When contacting the host, provide:
- The specific HTTP status code returned on
/wp-json/(from browser developer tools) - The timestamp of the failed publish attempt
- A request to check server error logs for ModSecurity rule triggers on
/wp-json/requests
Most hosting providers can whitelist the REST API path from ModSecurity inspection or adjust the ruleset sensitivity for your domain within minutes once given the rule ID from the server log.
Re-install WordPress Core Files as a Last Step
Corrupted WordPress core files can break REST API routing without triggering any obvious error. The safest re-install method uses the dashboard directly: go to Dashboard > Updates and click Re-install Now. WordPress downloads and replaces all core files without touching wp-config.php, wp-content, or the database (Kinsta, 2024).
The same result is achievable via WP-CLI with: wp core download --skip-content --force
After the re-install, go to Settings > Permalinks and click Save Changes to regenerate rewrite rules. Then test publishing. If the WordPress autosave not working error and the publishing failed error both clear, a corrupted core file was the cause. If neither clears, the root cause is in a plugin, theme, or server configuration that the core re-install does not touch.
Other WordPress errors that often appear alongside publishing failures include the WordPress updating failed error, the WordPress memory limit error, and WordPress mixed content warnings after HTTPS migrations. Fixing the publishing failed error often resolves all three simultaneously since they share the same REST API communication layer.
If you are still seeing the error after working through every fix in this guide, the locked out of WordPress troubleshooting guide covers cases where authentication issues run deeper than a nonce reset or role permission check.
For sites experiencing WordPress session expired errors alongside publishing failures, the two issues share the same nonce and cookie authentication layer and are typically resolved by the same REST API authentication fix.
FAQ on How To Fix The WordPress Publishing Failed Error
Why does WordPress say "Publishing failed"?
The Gutenberg block editor relies on the WordPress REST API to publish posts. When that request fails, the red banner appears. The most common causes are a blocked REST API, a security plugin conflict, or a URL mismatch in Settings > General.
How do I know if the REST API is blocked?
Navigate to yoursite.com/wp-json/ in your browser. Valid JSON means the REST API is working. An error page, login prompt, or blank response confirms it is blocked. You can also check Tools > Site Health for a direct REST API pass or fail status.
Can a security plugin cause the WordPress publishing failed error?
Yes. Wordfence, iThemes Security, and All-In-One WP Security all include settings that restrict REST API access. Temporarily deactivating the security plugin and retesting is the fastest way to confirm it is the cause before adjusting any settings.
Does the Classic Editor fix the publishing failed error?
It works as a temporary workaround. The Classic Editor plugin uses standard form submission instead of a REST API call, so it bypasses the error entirely. It does not fix the underlying cause, which still needs to be resolved in the block editor.
What HTTP status code does the publishing failed error produce?
Check the browser console (F12 > Network tab) during a failed publish attempt. A 403 points to a security plugin or permission block. A 401 indicates an authentication or nonce failure. A 404 means a routing issue, corrupted .htaccess, or missing Nginx try_files directive.
Can the WordPress URL settings cause a publishing failed error?
Yes. A mismatch between WordPress Address and Site Address in Settings > General breaks REST API authentication token routing. The most common mismatch occurs after an HTTP to HTTPS migration where one field was not updated to match the other.
Why does the publishing failed error appear after moving to HTTPS?
An incomplete HTTP to HTTPS migration leaves database URLs pointing to http://, producing mixed content errors that block REST API communication. Use the Better Search Replace plugin to update all database URLs from HTTP to HTTPS, then flush permalinks.
How do I fix the WordPress publishing failed error on Nginx?
Nginx does not use .htaccess. A missing try_files directive in the server block causes 404 errors on /wp-json/. Add try_files $uri $uri/ /index.php?$args; to the location / block, then run sudo nginx -t and restart Nginx.
Does low PHP memory cause the WordPress post update failed error?
Yes. Insufficient memory causes incomplete REST API responses. Add define('WP_MEMORY_LIMIT', '256M'); to wp-config.php above the "That's all, stop editing!" line. If the error persists, your hosting provider has a hard memory cap that requires a direct support request to raise.
What should I do if nothing fixes the WordPress publishing failed error?
Enable WP_DEBUG and check /wp-content/debug.log for PHP fatal errors during publish attempts. If the log shows nothing useful, contact your hosting provider and ask them to check server error logs for ModSecurity rule triggers on /wp-json/ requests.
Conclusion
This conclusion is for an article presenting every confirmed fix for the WordPress publishing failed error, from blocked REST API endpoints to corrupted .htaccess files and Nginx misconfigurations.
Most cases come down to one root cause. Find it using the WordPress Site Health tool or the browser console before touching any settings.
Work through the fixes in order: security plugin restrictions first, then URL mismatches, then plugin conflicts, then SSL configuration, then server-level issues.
If the WordPress autosave failure and block editor connection error both persist after all fixes, enable WP\_DEBUG and check the debug log. The answer is always there.
Publishing should work. Now it will.


