


Finance Website Design Examples to Ignite Your Creativity
May 30, 2026
Automatic image optimization into next-generation format
June 2, 2026Your font choice is doing more work than you think.
Knowing how to change fonts in WordPress is one of the first things that separates a generic-looking site from one that feels intentional. And yet, it trips up a surprising number of people, mostly because WordPress gives you at least 5 different ways to do it depending on your theme type, page builder, or how much code you're comfortable touching.
This guide covers every method, from the WordPress Customizer and Full Site Editor to custom CSS, theme.json, and page builders like Elementor and Divi. You'll also learn how to add custom fonts, avoid common font loading mistakes, and fix the issues that come up when a font change refuses to stick.
What Are WordPress Fonts and How Do They Work?

WordPress fonts are controlled by 3 layers: the font source (Google Fonts API, Adobe Fonts, or locally hosted files), the CSS font-family declaration, and the theme's enqueue function in functions.php.
Skip any one of those layers and the font either fails to load or gets overridden on the next theme update.
Font rendering also depends on format. WOFF2 is the standard for web use, appearing on 81% of desktop and 78% of mobile websites as of 2024 (HTTP Archive Web Almanac). WOFF and TTF still exist but add unnecessary file weight.
System fonts like Arial, Georgia, and Times New Roman load with zero external HTTP requests. Web fonts like those from Google Fonts add at least one DNS lookup and one file download per family loaded. That distinction matters as soon as Core Web Vitals enter the conversation.
WordPress 6.5 introduced the Font Library inside the Site Editor, letting users upload custom font files directly without touching code. That changed the workflow significantly for block theme users.
Classic Themes vs. Block Themes: Which Font Controls Apply
| Theme Type | Primary Font Control | Config File | Update-Safe |
|---|---|---|---|
| Classic theme | Customizer, Additional CSS | functions.php | Only via child theme |
| Block theme | Site Editor, Global Styles | theme.json | Yes, native |
| Page builder | Builder typography panel | Builder settings | Yes, stored in DB |
As of 2025, 28% of WordPress sites use block-based themes, up from 14% in 2024 (Digital Applied). That number is climbing fast as 75%+ of new themes are now built on FSE (Colorlib).
Font changes stored in the Customizer are saved as theme mods, not in the stylesheet. They survive minor theme updates but disappear if the theme is switched or deleted.
What Are the Different Ways to Change Fonts in WordPress?
There are 5 ways to change fonts in WordPress. Which one applies depends entirely on the theme type and how much control you need.
| Method | Best For | Scope | Requires Code |
|---|---|---|---|
| WordPress Customizer | Classic theme users | Global or per-element | No |
| Full Site Editor | Block theme users | Global and per-block | No |
| Font plugin | Both theme types | Global or selector-based | No |
| Custom CSS | Per-element overrides | Any element | Yes |
| theme.json | Block theme developers | Global defaults | Yes |
Plugins like Fonts Plugin and Easy Google Fonts work across both classic and block themes, making them the most portable option. Font changes from a plugin persist even if the theme is switched.
Classic Themes vs. Block Themes: Which Methods Apply
Classic themes use the WordPress Customizer or Additional CSS for font changes. The Customizer's Typography panel depends on the theme declaring support for it. Many themes, including popular ones like Astra and GeneratePress, add their own Typography sections with Google Fonts dropdowns built in.
Block themes use the Site Editor. Font changes made there are written to the theme's global styles layer, which sits above theme.json defaults. Per-block font overrides go directly in the block settings panel on the canvas.
Page builders have their own typography systems that operate independently of both.
How to Change Fonts Using the WordPress Customizer
The Customizer is the standard font-change method for classic theme users. Path: Appearance > Customize > Typography.
Not every classic theme exposes a Typography panel here. It depends on whether the theme registered that Customizer section. Themes like Twenty Twenty-One and most lite versions of premium themes skip it entirely.
Steps to Change Fonts in the Customizer
Open the Customizer and look for a Typography, Fonts, or Design section in the left sidebar. Most themes that support font changes via the Customizer load Google Fonts and give you a dropdown for body text and headings separately.
Select the font family and weight, then click Publish. The change is saved as a theme mod and is immediately reflected site-wide.
Preview updates in real time on the right side of the screen before publishing. This is the safest way to test how a font pairing looks across heading levels, body text, and navigation without committing.
What to Do If Your Theme Has No Typography Option in the Customizer
Option 1: Install Easy Google Fonts. It adds a full Typography panel to the Customizer for any classic theme, with per-element control down to paragraph tags, list items, and form inputs.
Option 2: Add fonts manually via Additional CSS (covered in the Custom CSS section below).
Option 3: Switch to a child theme and enqueue the font via functions.php, then target elements in the child theme stylesheet. This gives the most control and survives theme updates cleanly.
How to Change Fonts in the WordPress Full Site Editor
The Full Site Editor handles font changes for block theme users. Path: Appearance > Editor > Styles > Typography.
Changes made here write to the global styles layer, which overrides theme.json defaults without touching any files. This means a non-developer can change fonts site-wide without risking a theme update wiping the change.
How to Use the WordPress Font Library (6.5+)
WordPress 6.5 added the Font Library to the Site Editor under Appearance > Editor > Styles > Typography > Manage Fonts.
From there, you can install fonts from Google Fonts directly in the browser or upload your own custom font files. Uploaded fonts are stored in the wp-content/fonts directory and registered automatically for use across the site.
This is a genuine step forward. Before 6.5, custom font uploads required either a plugin or manual file placement plus @font-face declarations in the stylesheet.
How to Set Per-Block Fonts in the Site Editor
Global font settings apply to all blocks by default. To override a specific block, select it on the canvas, open the Style tab in the right sidebar, and change the typography settings there.
Per-block overrides take priority over global styles in the cascade. A Heading block set to Playfair Display will use that font even if the global heading font is set to something else.
Keep in mind: per-block overrides only affect that specific block instance, not all heading blocks across the site. Use Styles > Blocks in the Site Editor to apply a font change to all instances of a specific block type.
How to Change Fonts in WordPress Using a Plugin
Font plugins are the most portable method. They work on classic and block themes, survive theme switches, and require no code.
Google Web Fonts is used by nearly 12 million websites, appearing on 8.3 million unique domains (Toner Buzz, 2024). Most WordPress font plugins tap into that library directly.
How to Change Fonts with Fonts Plugin
Install: Search "Fonts Plugin" in the WordPress plugin repository and activate it. The plugin adds a Typography section to the Customizer.
Fonts Plugin supports 1,000+ Google Fonts and applies changes via CSS selectors, meaning it works regardless of theme. Font changes are stored in the plugin's own settings, not in the theme, so switching themes doesn't erase them.
The free version covers global body and heading fonts. The premium version adds per-element control, Adobe Fonts support, and local font hosting.
How to Change Fonts with Easy Google Fonts
Easy Google Fonts takes a different approach. Rather than building its own interface, it extends the native WordPress Customizer with a full Typography section.
Each font control maps to a specific CSS selector. You can assign different fonts to body, h1-h6, navigation links, and widget titles individually. Changes preview in real time inside the Customizer window before publishing.
The plugin also generates its own stylesheet rather than using @import, which avoids some of the render-blocking issues that come with inline Google Fonts loading.
How to Change Fonts in WordPress Using Custom CSS
Custom CSS gives the most granular control over font assignment. You target specific HTML elements directly and the change applies to exactly those elements, nothing else.
Path for classic themes: Appearance > Customize > Additional CSS. Path for block themes: Appearance > Editor > Styles > Additional CSS.
How to Enqueue Google Fonts in functions.php
Before the CSS declaration works, the font must be loaded. For classic themes, that means adding it to functions.php in a child theme.
The correct approach uses wp_enqueue_style() inside a function hooked to wp_enqueue_scripts. This tells WordPress to output the Google Fonts <link> tag in the <head> correctly.
Using @import inside a stylesheet works too but adds a second HTTP request and can trigger render-blocking warnings in Google PageSpeed Insights. The wp_enqueue_style() method is cleaner for performance.
CSS Selectors for Common Font Targets
Once the font is enqueued, the declaration in Additional CSS looks like this:
body {
font-family: 'Open Sans', sans-serif;
}

h1, h2, h3 {
font-family: 'Playfair Display', serif;
}

nav a {
font-family: 'Roboto', sans-serif;
}
The font stack fallback (the second value after the comma) is not optional. If the web font fails to load, the browser uses the next font in the stack. Always include a generic family like sans-serif or serif as the final fallback.
CSS specificity issues are the most common reason a custom font change doesn't apply. If the theme's own stylesheet uses a more specific selector, it wins. Inspect with browser DevTools (F12 > Elements > Computed) to find the conflicting rule and match or exceed its specificity.
How to Change Fonts in theme.json for Block Themes
theme.json is the configuration file that controls all global styles in a block theme, including typography. Editing it directly gives developers full control over default font settings across the entire site.
Changes to theme.json apply as defaults. They sit below the global styles layer that users control in the Site Editor. A user font change in the editor will always override theme.json values.
theme.json Font Family Declaration Structure
Font families are declared under settings.typography.fontFamilies. Each entry requires 3 fields: name (the display label), slug (a unique identifier), and fontFamily (the CSS value).
For a system font stack, no fontFace array is needed. For a custom or web font, fontFace specifies the source file path, weight, and style.
Example structure for a locally hosted custom font:
{
"settings": {
"typography": {
"fontFamilies": [
{
"name": "Inter",
"slug": "inter",
"fontFamily": "Inter, sans-serif",
"fontFace": [
{
"fontFamily": "Inter",
"fontWeight": "400 700",
"fontStyle": "normal",
"src": ["file:./assets/fonts/Inter.woff2"]
}
]
}
]
}
}
}
How to Add Custom Fonts via theme.json
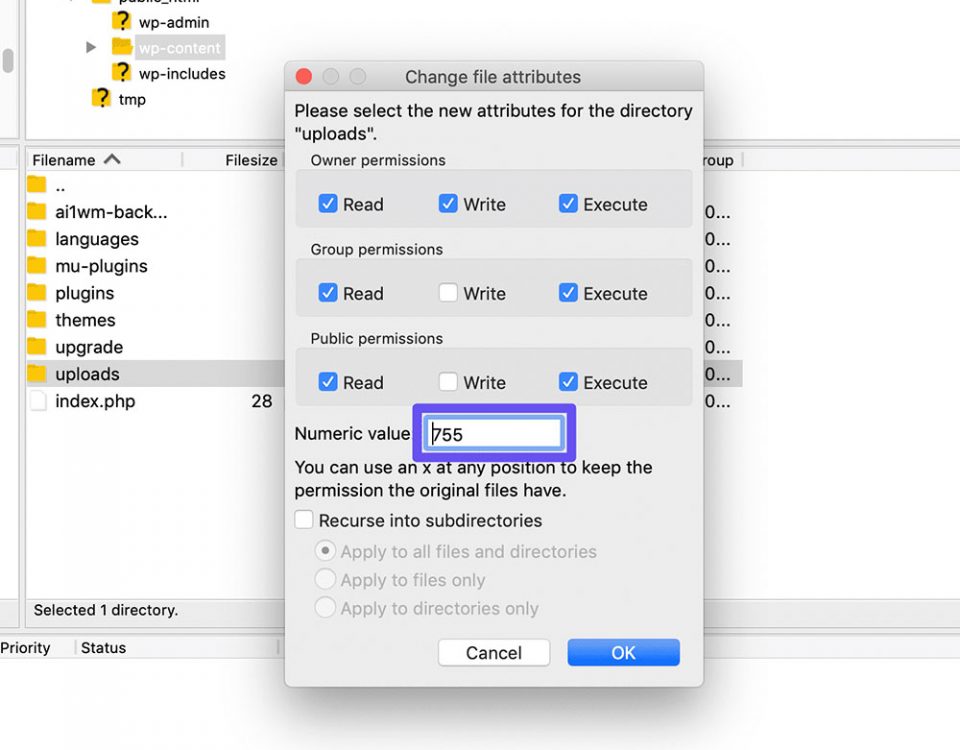
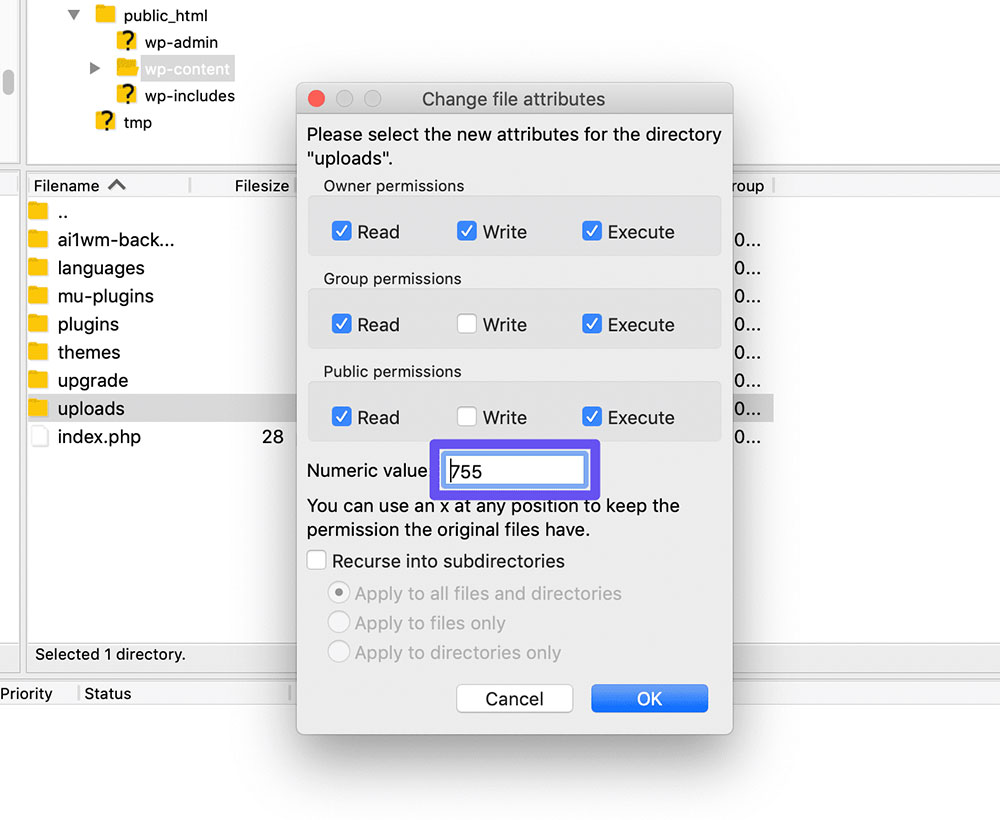
Place the font file (WOFF2 format) in a /assets/fonts/ directory inside the theme folder. Reference it in the src field using the file:./ prefix.
The fontWeight field accepts a range (like "400 700") for variable fonts or a single value for static fonts. Variable fonts cover multiple weights in one file, which reduces total HTTP requests and file download size.
To apply the font site-wide as the default body font, add a styles block at the root level of theme.json:
"styles": {
"typography": {
"fontFamily": "var(--wp--preset--font-family--inter)"
}
}
WordPress generates the CSS custom property name automatically from the font slug. The format is always --wp--preset--font-family--{slug}.
If making changes to a third-party block theme, always use a child theme with its own theme.json. Parent theme updates will overwrite the file otherwise. The child theme's theme.json merges with the parent at runtime, so only the fields you override need to be included.
Good typography in web design is not just about font choice. The way fonts are declared, loaded, and structured in code has a direct effect on how the site performs and how consistently the font renders across devices and browsers.
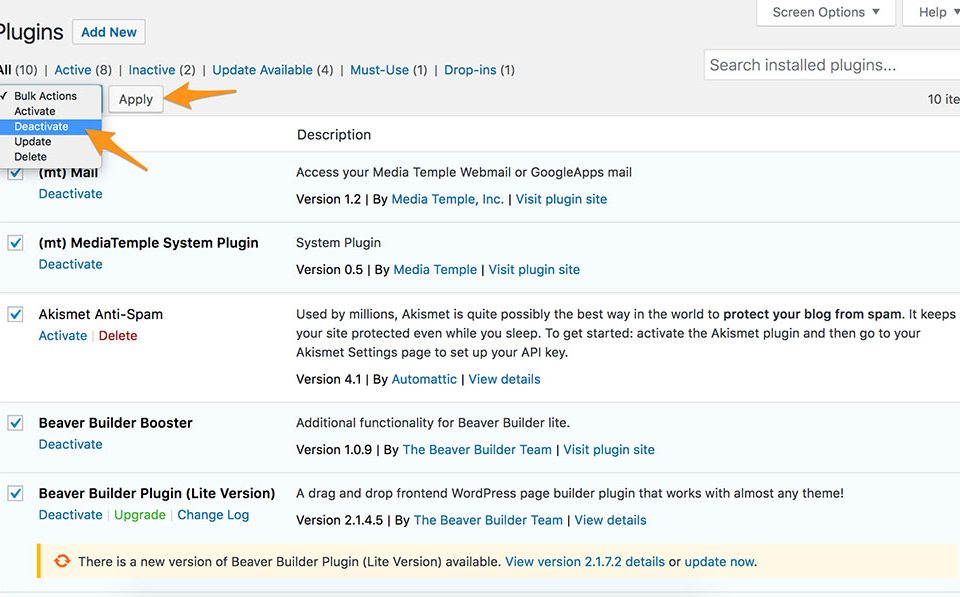
How to Change Fonts in Page Builders (Elementor, Divi, Beaver Builder)
Page builders have their own typography systems that run independently of WordPress core. Font changes made inside Elementor, Divi, or Beaver Builder are stored in those builders' own settings, not in the theme or Customizer.
Approximately 60% of WordPress sites now use some form of page builder, up from 45% in 2022 (Colorlib). Elementor alone powers 13.1% of all WordPress sites, holding 40-50% of the page builder market.
| Builder | Global Font Path | Per-Element Override | Adobe Fonts |
|---|---|---|---|
| Elementor | Site Settings > Global Fonts | Style tab, per widget | Pro only |
| Divi | Theme Customizer > Typography | Design tab, per module | Yes |
| Beaver Builder | Global Settings > Fonts | Per-module Style tab | Yes |
CSS specificity from page builders is usually higher than theme stylesheets. A font set inside Elementor will override the theme's font declaration without any extra CSS needed.
How to Change Fonts in Elementor
Elementor defines 4 global font styles: Primary, Secondary, Text, and Accent. These map to headings, subheadings, body text, and accent elements respectively.
Path: Site Settings > Global Fonts. Each slot accepts any Google Font, a custom uploaded font (Pro), or a system font. Changes apply site-wide instantly without republishing individual pages.
Per-widget overrides go through the Style tab inside the editor. Click any text widget, open the Style tab, and look for the Typography field. The globe icon switches to a global preset; the pencil icon opens the full font picker.
Elementor Pro supports custom font uploads natively, storing font files on the server and serving them locally. This removes the Google Fonts external request entirely.
How to Change Fonts in Divi
Divi keeps global typography under Theme Customizer > General Settings > Typography. That panel controls body font, heading font, and navigation font separately.
Per-module overrides sit in the Design tab of each module. Font changes there only affect that specific module instance, not all modules of the same type.
One thing worth knowing: Divi loads Google Fonts by default for every font family selected, even if the same font is already loaded by the theme. This can create duplicate font requests. Divi's built-in "Improve Google Fonts Loading" option under Performance settings consolidates those requests into one.
How to Change Fonts in Beaver Builder
Site-wide font control: Beaver Builder > Settings > Fonts (in the WordPress admin). This sets the default font family and weight for body and headings across all pages built with Beaver Builder.
Per-module typography is in each module's Style tab, under the Typography section. Beaver Builder applies font changes cleanly with minimal CSS specificity conflicts, which is one reason developers who care about output code quality tend to prefer it.
Beaver Builder supports Google Fonts, Adobe Fonts, and system fonts. Custom fonts require either a third-party plugin or manual @font-face declarations added to the child theme stylesheet.
How to Add Custom Fonts to WordPress
Custom fonts are fonts not available in Google Fonts or your theme's default options. They come from commercial foundries like Adobe Fonts or Font Shop, or from brand asset files that need to be self-hosted.
WOFF2 is the required format. It is used on 81% of desktop websites (HTTP Archive Web Almanac, 2024) and compresses font files significantly smaller than TTF or OTF. Always convert to WOFF2 before uploading.
How to Upload Fonts via the WordPress Font Library
WordPress 6.5 added native font upload directly in the Site Editor. Path: Appearance > Editor > Styles > Typography > Manage Fonts.
Click the Upload tab, select a WOFF2 file, and the font is stored in wp-content/fonts/ and registered automatically for block theme use. No plugin or code required.
This only works on block themes. Classic theme users need a plugin or manual @font-face declaration.
How to Add Fonts Manually via @font-face
Place the WOFF2 file in the child theme's /fonts/ folder. Then add the @font-face declaration to the child theme stylesheet:
@font-face {
font-family: 'BrandFont';
src: url('/wp-content/themes/child-theme/fonts/BrandFont.woff2')
format('woff2');
font-weight: 400;
font-style: normal;
font-display: swap;
}
After declaring the font, use it in a CSS rule targeting the element: body { font-family: 'BrandFont', sans-serif; }.
The font-display: swap line is not optional if performance matters. It tells the browser to show the fallback font immediately and swap in the custom font once it loads, preventing invisible text during the loading phase.
Font Licensing: What to Check Before Using a Commercial Font
Desktop licenses and web licenses are different products. Buying a font for print or desktop use does not give web hosting rights.
Check for these 3 license types before hosting any commercial font on a WordPress site:
- Web license: Required for
@font-faceself-hosting. Usually priced per number of monthly pageviews. - Desktop license: Covers local computer use only. Not valid for web embedding.
- SaaS/CDN license: Covers serving via a third-party CDN like Adobe Fonts. Required if using Typekit.
Google Fonts and Fontsource are open-source (SIL Open Font License). They can be self-hosted freely with no pageview limits.
How to Change Fonts Without Slowing Down Your Site
Font loading is one of the most common causes of poor Core Web Vitals scores on WordPress sites. Loading Google Fonts via external CDN makes 3 network hops before text renders: DNS lookup to fonts.googleapis.com, connection to fonts.gstatic.com, then the actual font file download (DEV Community).
On mobile 4G connections, that external round-trip delays LCP by 200 to 500ms (Visionary Web Performance, 2026). For a site with a text-heavy hero section, that is the LCP element waiting on a font.
How to Host Google Fonts Locally in WordPress
Self-hosting eliminates the external DNS lookup and CDN dependency entirely. The 2025 Web Almanac shows 31.5% of desktop sites now exclusively self-host their fonts, up from 28% in 2024 (corewebvitals.io).
OMGF (Optimize My Google Fonts) handles this automatically:
- Install and activate OMGF from the WordPress plugin repository
- Go to Settings > Optimize Google Fonts
- Confirm the Font-Display option is set to "Swap (recommended)"
- Click "Save & Optimize"
OMGF scans the site, downloads font files from Google, stores them locally, and rewrites the font references in the stylesheet. No manual file management needed.
How to Use font-display: swap in WordPress
Without font-display: swap, some browsers show invisible text until the web font loads (FOIT, Flash of Invisible Text). This directly harms LCP when the largest visible element is a heading.
4 ways to add font-display: swap in WordPress:
- WP Rocket: added automatically on installation
- LiteSpeed Cache: Page Optimization > CSS Settings > Font Display Optimization
- OMGF: set in the Font-Display Option dropdown
- Manual: add
font-display: swapinside each@font-facedeclaration
Limit font families to 2 and font weights to 3-4 per family. Each additional weight is a separate file download. A site loading Roboto in weights 300, 400, 500, 600, 700, and 900 is downloading 6 separate files for one font family.
Variable fonts solve this. A single variable WOFF2 file covers the full weight range, replacing those 6 files with 1. Google Fonts serves variable versions for most of its popular families when the URL uses wght range syntax (e.g., [email protected]).
If you want to see how good font handling affects the overall experience on screen, look at examples of websites with strong typography execution. The difference between a site with optimized font loading and one without is visible in both PageSpeed scores and how text appears on first load.
How to Fix Common Font Change Problems in WordPress
Font changes not applying is almost always one of 5 problems. None of them require rebuilding anything. Each has a specific fix.
Sites with low readability scores show a bounce rate up to 20% higher than well-rendered counterparts (Search Engine Journal). Getting the font change to stick is not just a visual concern.
Browser or Server Cache Serving the Old Font
The most common reason a font change appears to do nothing is caching. The new stylesheet is there. The browser or caching plugin is still serving the old one.
Fix: Clear cache in this order: WordPress caching plugin first (WP Rocket, LiteSpeed Cache, W3 Total Cache), then CDN cache if using Cloudflare or another CDN, then hard-refresh the browser (Ctrl+Shift+R on Windows, Cmd+Shift+R on Mac).
Do all 3, in that order. Clearing only the browser cache while the CDN still serves stale CSS wastes the step.
CSS Specificity Conflict Overriding the New Font
Theme or plugin CSS uses a more specific selector than the custom declaration. The browser applies the more specific rule regardless of order.
Diagnose with DevTools: right-click the text element, Inspect, open the Computed tab, find font-family, and trace the winning rule. The conflicting selector is shown with its source file and line number.
Match or exceed the specificity of the conflicting rule. If the theme uses .site-content p and the custom CSS uses just p, the theme wins. Changing the custom rule to .site-content p resolves it.
Google Font Not Loading Due to Blocked Requests
Ad blockers, privacy-focused browsers (Brave, Firefox with strict mode), and some corporate networks block requests to fonts.googleapis.com.
Quick test: open the site in an incognito window with extensions disabled. If the font loads there but not normally, the issue is a browser extension or privacy setting, not the WordPress setup.
The fix is local hosting via OMGF. Serving fonts from the same domain bypasses all third-party blocking.
Customizer Change Not Saving
A caching plugin is intercepting the Customizer preview or save request. This is tricky because the Customizer's live preview uses an iFrame that pulls a cached version of the page.
Fix options:
- Exclude the Customizer endpoints (
?customize_theme) from the caching plugin's page cache rules - Temporarily disable the caching plugin, make the font change, publish, then re-enable caching
WP Rocket and LiteSpeed Cache both have known Customizer compatibility settings that handle this automatically when enabled.
Child Theme Not Inheriting Parent Font
The parent theme enqueues its Google Font via a separate handle in functions.php. The child theme does not re-enqueue it, so the font file never loads.
The fix is re-enqueuing the font in the child theme's own functions.php using wp_enqueue_style(). The child theme's function hooks to wp_enqueue_scripts at priority 20 (after the parent at 10) to make sure it loads after the parent stylesheet.
Alternatively, declare the font via the @import rule at the top of the child theme's style.css. This is simpler but adds a render-blocking request. The wp_enqueue_style() method is cleaner for performance.
Understanding how fonts interact with the broader design system also helps when troubleshooting. The same font loading principles that apply to WordPress apply to any web build. If you want to see the range of problems that appear when foundational web design decisions go wrong, a look at sites with poor design execution shows how typography problems compound with other layout issues. And if you want real-world references for what good implementation looks like, reviewing fonts that prioritize readability gives a practical reference point before choosing a font family for any WordPress project.
FAQ on How To Change Fonts In WordPress
Can I change fonts in WordPress without a plugin?
Yes. Classic themes use the WordPress Customizer under Appearance > Customize > Typography. Block themes use the Full Site Editor. Both methods require no plugin. Custom CSS via Additional CSS works for either theme type.
Why is my font change not showing up after saving?
Almost always a caching issue. Clear your WordPress caching plugin first, then your CDN cache, then hard-refresh the browser with Ctrl+Shift+R. If the font still doesn't appear, a CSS specificity conflict is likely overriding the new declaration.
What is the best plugin to change fonts in WordPress?
Fonts Plugin and Easy Google Fonts are the most reliable free options. Both support Google Fonts and work across classic and block themes. Fonts Plugin stores changes independently of the theme, so font settings persist even after switching themes.
How do I add Google Fonts to WordPress?
Install Easy Google Fonts or Fonts Plugin, select your font family, and assign it to body or heading elements. Alternatively, enqueue the font in functions.php using wp_enqueue_style() and apply it via CSS font-family declarations.
How do I change fonts in Elementor?
Go to Site Settings > Global Fonts inside the Elementor editor. Assign fonts to the Primary, Secondary, Text, and Accent slots. For per-widget overrides, select the widget, open the Style tab, and adjust the Typography field directly.
What font format should I use for WordPress?
WOFF2 is the correct format for web use. It is smaller than TTF or OTF and supported by all modern browsers. If uploading a custom font, convert it to WOFF2 first using Font Squirrel's Web Font Generator or Google Fonts Helper.
How do I change fonts in a block theme using the Site Editor?
Go to Appearance > Editor > Styles > Typography. Select the element you want to change and pick a font family. Changes are saved to the global styles layer and override theme.json defaults without editing any files directly.
How do I add a custom font to WordPress that is not in Google Fonts?
Upload the WOFF2 file via Appearance > Editor > Styles > Manage Fonts (WordPress 6.5+), or use the Use Any Font plugin for classic themes. Manually, place the file in the child theme folder and declare it with a @font-face rule.
How do I change fonts in theme.json?
Add a font family entry under settings.typography.fontFamilies with a name, slug, and fontFamily value. To apply it site-wide, reference the generated CSS custom property in the styles.typography.fontFamily field. Always use a child theme to avoid update overwrites.
Do custom fonts slow down my WordPress site?
They can. External Google Fonts requests add DNS lookups that delay Largest Contentful Paint. Self-hosting fonts via OMGF removes that overhead. Adding font-display: swap prevents invisible text during load and directly improves Core Web Vitals scores.
Conclusion
This conclusion is for an article presenting every practical method for changing fonts in WordPress, from theme.json declarations and the Full Site Editor to page builder typography panels and manual @font-face rules.
The method that works for you depends on your theme type. Classic themes, block themes, and page builders each have a different entry point, and picking the wrong one wastes time.
Whatever path you take, prioritize WOFF2 format, limit font weights, and self-host where possible. Those 3 decisions directly affect your Core Web Vitals scores and how fast text renders on first load.
Font rendering, CSS specificity, and wp\enqueue\style() are learnable. Start with the method that matches your setup, test with PageSpeed Insights, and adjust from there.


