


How to edit the WordPress excerpt length easily
January 24, 2026
Realtor Website Design: Inspiring Examples for Success
January 26, 2026Your site just crashed. No warning, no graceful fallback. Just a white screen or a "critical error" message where your homepage used to be.
Nine times out of ten, the cause is the WordPress memory limit. PHP ran out of RAM mid-execution, and everything stopped.
The fix is straightforward once you know where to look. But picking the wrong method for your server setup, or editing the wrong file, can make things worse.
This guide covers how PHP memory allocation works in WordPress, how to check your current limit, and the four reliable ways to increase it through wp-config.php, .htaccess, php.ini, and your hosting control panel. Plus how to find what is eating all that memory in the first place.
What is the WordPress Memory Limit
WordPress memory limit is the maximum amount of server RAM that PHP can allocate to a single WordPress process or script execution.
It is defined by the WPMEMORYLIMIT constant inside wp-config.php and controlled at the server level by the memorylimit PHP directive.
WordPress sets this value to 40MB for single site installations and 64MB for multisite networks by default. Your hosting provider's PHP configuration determines the actual ceiling.
When a plugin, theme, or core process tries to use more RAM than this limit allows, WordPress throws a fatal error. The site either goes blank or displays "There has been a critical error on this website."
The WordPress memory limit exists to prevent a single PHP script from consuming all available server resources. Without it, one poorly coded plugin could crash every site on a shared hosting server.
Two separate values matter here. WPMEMORYLIMIT controls frontend memory allocation. WPMAXMEMORYLIMIT controls the WordPress admin dashboard and defaults to 256MB.
Both of these are still subject to whatever hard cap your server's php.ini file sets through the memorylimit directive. WordPress cannot grant itself more memory than the server allows.
I'm interrupting the article to tell you about BeTheme, the definitive multipurpose theme. If trying to satisfy multiple clients has become more stressful than rewarding, BeTheme is the solution for that.

BeTheme’s selection of hundreds of customizable, responsive pre-built websites is the highlight and a proven stress reducer.
The customizability of the theme makes it a dream come true for its users. There are 4 types of Page Builders that you can use with it: WPBakery, BeBuilder, and Elementor among them.
And now with the Live Builder, it’s even more impressive.
Check out BeTheme and see why our users love it!
The rest of the article is down below.
What is the Default WordPress Memory Limit
The default WordPress memory limit is 40MB for single site installations and 64MB for multisite networks.
These values are coded into WordPress core. They apply when no custom WPMEMORYLIMIT definition exists in your wp-config.php file.
Most hosting providers override these defaults at the server level. Shared hosting plans from providers like Bluehost, SiteGround, or Hostinger typically set PHP memory somewhere between 64MB and 256MB.
The admin-side limit is separate. WordPress uses WPMAXMEMORYLIMIT for backend tasks, and it defaults to 256MB. This higher allocation handles heavier operations like plugin updates, media uploads, and database queries in the dashboard.
Here is how the defaults break down:
- Single WordPress site (frontend): 40MB
- Multisite network (frontend): 64MB
- Admin dashboard (all installations): 256MB
- Server-level PHP memorylimit: varies by host, typically 64MB to 512MB
Took me a while to figure out that the WordPress default and the server default are two different things. Setting WPMEMORYLIMIT to 256M does nothing if your hosting provider caps PHP at 128MB.
The server-level limit always wins.
How Does WordPress Memory Limit Work
Every time someone visits your WordPress site, the server starts a PHP process. That process loads WordPress core files, active plugins, your theme, and runs database queries through MySQL or MariaDB.
Each of these operations eats into the memory allocation.
PHP requests a block of RAM from the server for each script execution. The memorylimit directive in php.ini sets the maximum size of that block. WordPress then applies its own limit on top of that through WPMEMORYLIMIT.
Think of it as two gates. The server-level PHP limit is the outer gate. The WordPress memory limit is the inner gate. The inner gate can never be wider than the outer one.
If your server allows 256MB and you set WPMEMORYLIMIT to 128M, WordPress uses 128MB maximum. If your server allows 64MB and you set WordPress to 256M, the actual cap stays at 64MB.
Memory usage spikes happen during specific operations:
- Loading multiple plugins simultaneously
- Processing large image uploads and generating thumbnails
- Running WooCommerce with thousands of products
- Page builders like Elementor or Divi rendering complex layouts
- Backup plugins compressing site files
- WP-Cron executing scheduled tasks in the background
On Apache servers running modphp, each request gets its own memory pool. On NGINX with PHP-FPM, memory is allocated per PHP worker process. The architecture matters because PHP-FPM pools can be tuned individually on a VPS or dedicated server.
Once a PHP process finishes executing, the memory is released back to the server. WordPress does not hold onto RAM between page loads.
What Causes the WordPress Memory Exhausted Error
The WordPress memory exhausted error appears when a PHP script tries to allocate more RAM than the current limit allows.
The full error message reads:
Fatal error: Allowed memory size of XXXXX bytes exhausted (tried to allocate XXXXX bytes)
Newer WordPress versions (5.2 and above) hide this behind a generic screen that says "There has been a critical error on this website." You can still see the actual error by enabling WPDEBUGLOG in your wp-config.php or checking your server's PHP error log.
The most common triggers:
- Installing or activating a resource-heavy plugin
- Uploading high-resolution images (WordPress generates multiple thumbnail sizes on upload)
- Importing large amounts of content via CSV or XML
- Running a WooCommerce store with a large product catalog
- Page builders rendering complex, multi-section layouts
- Security plugins like Wordfence running full site scans
- Outdated PHP versions handling memory less efficiently
- Poorly coded themes with memory leaks
Sometimes the error only shows up on specific pages. Sometimes it hits the entire site. It depends on which script crosses the memory ceiling during that particular request.
What Plugins Cause High Memory Usage in WordPress
Page builders top the list. Elementor, Divi, and WPBakery load large amounts of CSS, JavaScript, and PHP to render visual layouts. WooCommerce with thousands of products and active extensions runs heavy database queries on every page load.
Backup plugins like UpdraftPlus or Jetpack Backup compress entire site directories in real time. Security plugins such as Wordfence and Sucuri run file integrity scans that read every PHP file on the server.
Does PHP Version Affect WordPress Memory Usage
Yes. PHP 8.x handles memory allocation more efficiently than PHP 7.x. Upgrading from PHP 7.4 to PHP 8.2 or 8.3 can reduce memory consumption by 10-30% depending on your plugin stack, because the newer engine compiles and executes code with less overhead.
Only 4.4% of WordPress sites run the latest PHP version. The rest use older versions that consume more memory for the same operations.
How to Check WordPress Memory Limit
Before changing anything, check what your current PHP memory limit actually is. The number you see might not match what you expect, especially on shared hosting.
There are three reliable ways to check.
How to Check PHP Memory Limit in WordPress Site Health
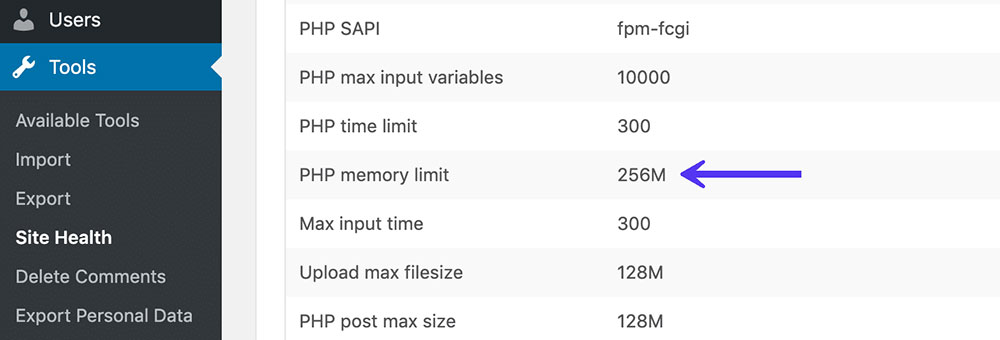
Go to Tools > Site Health > Info > Server in your WordPress dashboard. Look for "PHP memory limit." This is the active server-level cap, which is the number that actually matters.
How to Check WordPress Memory Limit in wp-config.php
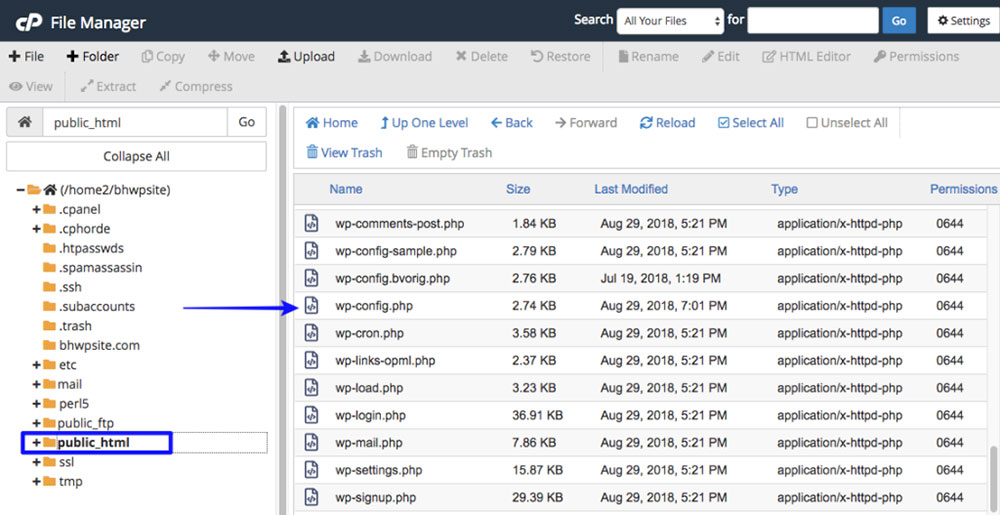
Open your wp-config.php file via FTP (FileZilla, Cyberduck) or your hosting File Manager. Search for WPMEMORYLIMIT. If the line does not exist, WordPress is using its default 40MB or 64MB value.
How to Check PHP Memory Limit in cPanel
Log into cPanel, go to Software > MultiPHP INI Editor, and select your domain from the dropdown. The memorylimit value shown there is your server-level PHP memory allocation. On Plesk, look under PHP Settings for the same directive.
How to Increase WordPress Memory Limit
Four methods work. The right one depends on your hosting setup and what level of server access you have.
Always back up your site before editing any configuration file. A misplaced line in wp-config.php or .htaccess can take down the entire site.
How to Increase WordPress Memory Limit in wp-config.php
This is the most reliable method across all hosting environments. Open your wp-config.php file through FTP (FileZilla, Cyberduck) or your hosting control panel's File Manager.
Find the line that says / That's all, stop editing! Happy publishing. / and add this code directly above it:
define( 'WPMEMORYLIMIT', '256M' );
Save the file and upload it back to your server's root directory (publichtml or www folder). Refresh your site.
If a WPMEMORYLIMIT line already exists, change the value instead of adding a duplicate. Two definitions for the same constant will cause a PHP error.
This tells WordPress to request up to 256MB of RAM per script execution. It only works if your server's PHP memorylimit is set to 256MB or higher.
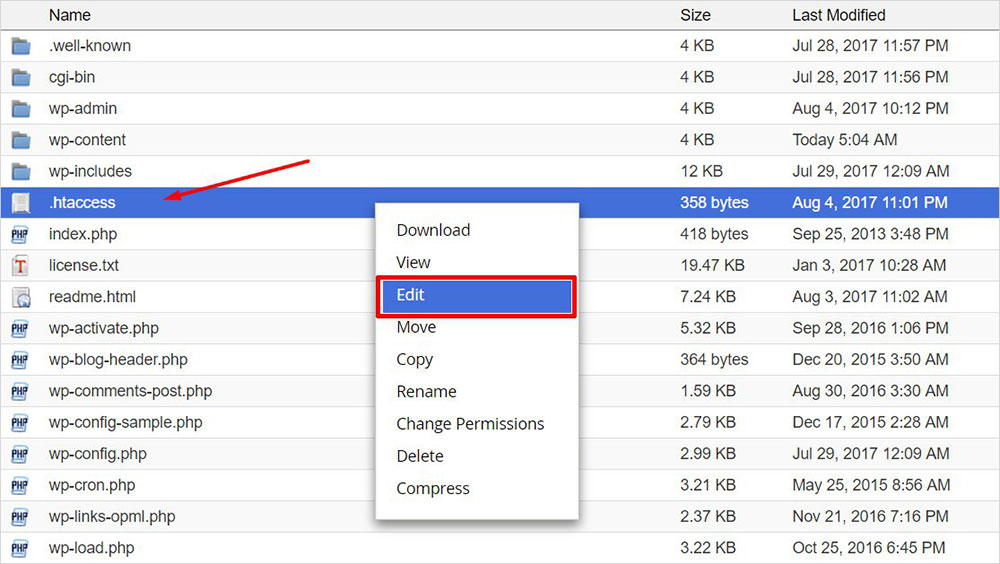
How to Increase WordPress Memory Limit in .htaccess
This method only works on Apache servers running modphp. It will not work on NGINX or servers using PHP-FPM.
Open the .htaccess file in your WordPress root directory. Add this line before # END WordPress:
phpvalue memorylimit 256M
Save and upload. If you get a 500 Internal Server Error immediately after, your server does not support this method. Restore the backup of your .htaccess file and try the wp-config.php approach instead.
How to Increase WordPress Memory Limit in php.ini
Editing php.ini changes the PHP memory allocation server-wide, not just for WordPress. Every PHP application on the server gets the new limit.
Locate your php.ini file (location varies by host) and find this line:
memorylimit = 64M
Change it to:
memorylimit = 256M
Many shared hosting providers block direct php.ini edits. If the file does not exist in your root directory or changes have no effect, use the cPanel method below.
How to Increase WordPress Memory Limit from Hosting Control Panel
In cPanel, go to Software > MultiPHP INI Editor, select your domain, and adjust the memorylimit value from the dropdown or input field.
On Plesk, navigate to PHP Settings for your domain and change memorylimit there. Hostinger users can access this through hPanel > Advanced > PHP Configuration.
Save changes. Verify through Tools > Site Health > Info > Server in your WordPress dashboard to confirm the new limit is active.
What is WPMAXMEMORYLIMIT in WordPress
WPMAXMEMORYLIMIT is a separate WordPress constant that controls memory allocation for admin-side and backend operations only.
It defaults to 256MB. WordPress uses this higher value for the dashboard, plugin updates, media uploads, and WP-Cron tasks running in the background.
WPMEMORYLIMIT handles frontend requests (what visitors see). WPMAXMEMORYLIMIT handles everything inside /wp-admin/.
To increase it, add this line to wp-config.php above the "stop editing" comment:
define( 'WPMAXMEMORYLIMIT', '512M' );
Most sites never need to touch this value. But if you run a WooCommerce store with thousands of products or process large CSV imports through the admin panel, bumping it to 512MB can prevent timeout errors during those heavy operations.
What is the Recommended WordPress Memory Limit
It depends on what your site does. A personal blog with five plugins runs fine on 128MB. A business site built with Elementor or Divi needs at least 256MB.
General guidelines:
- Small blogs, brochure sites: 128MB
- Business sites with page builders: 256MB
- WooCommerce stores (under 1,000 products): 256MB
- Large WooCommerce stores, membership sites: 512MB
- Multisite networks with 10+ subsites: 512MB or higher
Setting the value higher than you need does not hurt performance. PHP only uses what it actually requires per request and releases the rest.
But setting it too low causes random crashes, white screens, and failed admin operations. At least in my experience, 256MB covers 90% of WordPress sites without issues.
Why Does Increasing WordPress Memory Limit Not Work
You edited wp-config.php, saved the file, refreshed the site, and the error is still there. This happens more often than people expect.
Common reasons:
- Server-level PHP cap is lower than your WordPress setting. If your host enforces 128MB at the server level, setting WPMEMORYLIMIT to 256M changes nothing. The server always wins.
- Code placed in the wrong location inside wp-config.php. The define() line must go above
/ That's all, stop editing! /and below the opening<?phptag. - Wrong file edited. Some hosting setups have multiple wp-config.php files or cached versions. Clear server-side caching after changes.
- The .htaccess method used on an NGINX server. NGINX ignores .htaccess entirely. Use php.ini or the hosting control panel instead.
- Syntax error in the code. Missing semicolons, wrong quote marks (curly quotes instead of straight quotes), or a typo in the constant name.
If none of these apply, contact your hosting provider directly. Some shared hosting plans from providers like GoDaddy or Bluehost enforce hard memory caps that cannot be overridden from any configuration file. Upgrading to a VPS or managed WordPress hosting (WP Engine, Kinsta) gives you full control over PHP-FPM pool settings and memory allocation.
How to Reduce WordPress Memory Usage
Increasing the limit fixes the immediate error. But if your site keeps hitting the ceiling, the actual problem is something consuming too much PHP memory in the first place.
Throwing more RAM at an inefficient setup is a temporary fix. Finding the cause is the permanent one.
How to Find Which Plugin Uses the Most Memory in WordPress
Install Query Monitor. It shows per-component memory usage, database query times, and PHP errors for every page load. Check the "Overview" panel to see total peak memory and which hooks or plugins consume the most.
Enable WPDEBUGLOG in wp-config.php to write PHP warnings and errors to a debug.log file inside wp-content, which often reveals exactly which plugin or function triggered the memory exhaustion.
How to Reduce Plugin Memory Consumption in WordPress
Deactivate plugins you are not actively using. Replace heavy plugins with lighter alternatives (swap a full-suite security plugin for a focused firewall, swap a bulky slider plugin for native WordPress blocks).
Disable WordPress WP-Cron and set up a real server-side cron job through cPanel or SSH instead. WP-Cron fires on every page load by default, adding unnecessary memory overhead to frontend requests.
Does Image Size Affect WordPress Memory Limit
Yes. When you upload a 5MB image, WordPress generates multiple thumbnail sizes in memory. A single 4000x3000 pixel photo can spike PHP memory usage by 40-60MB during the thumbnail generation process alone.
Resize and compress images before uploading. Tools like TinyPNG, ShortPixel, or Imagify reduce file size without visible quality loss. Keeping source images under 2000px wide and below 500KB prevents most upload-related memory spikes.
Does Hosting Type Affect WordPress Memory Limit
The type of hosting you use determines how much control you have over server memory and PHP configuration.
- Shared hosting (Hostinger, Bluehost, GoDaddy): Typically caps PHP memory between 64MB and 256MB. You share server resources with hundreds of other sites. Limited configuration access.
- VPS hosting (DigitalOcean, Linode, Vultr): Full control over php.ini, PHP-FPM pool settings, and NGINX or Apache configuration. You set your own memory limits. Common range: 256MB to 1GB.
- Dedicated servers: Complete control over all server resources. Memory limits are only restricted by the physical RAM installed on the machine.
- Managed WordPress hosting (WP Engine, Kinsta, Cloudways): Pre-configured with higher memory defaults, typically 256MB or more. PHP-FPM and server-level caching optimized for WordPress out of the box.
If your shared hosting plan keeps hitting memory walls despite optimization, the hosting plan itself is the bottleneck. Moving to a VPS or managed host is often cheaper long-term than constantly fighting resource limits on a $5/month shared plan.
On a VPS running NGINX with PHP-FPM, you can tune individual worker pools per site. Each pool gets its own memorylimit, maxchildren, and process management settings. That level of control does not exist on shared hosting.
FAQ on WordPress Memory Limit
What is the default memory limit in WordPress?
WordPress sets the default PHP memory limit to 40MB for single site installations and 64MB for multisite networks. The admin dashboard uses WPMAXMEMORYLIMIT, which defaults to 256MB for backend operations like plugin updates and media uploads.
How do I check my current WordPress memory limit?
Go to Tools > Site Health > Info > Server in your WordPress dashboard. The PHP memory limit value shown there is your active server-level cap. You can also check wp-config.php for a custom WPMEMORYLIMIT definition.
How do I increase WordPress memory limit in wp-config.php?
Add define( 'WPMEMORYLIMIT', '256M' ); to your wp-config.php file above the "stop editing" comment line. Save and upload via FTP or File Manager. This only works if your server's PHP memorylimit is 256MB or higher.
Why does increasing WPMEMORYLIMIT not work?
Your hosting provider's server-level PHP cap overrides the WordPress setting. If the server enforces 128MB through php.ini, setting WPMEMORYLIMIT to 256M has no effect beyond 128MB. Contact your host or upgrade your plan.
What is the difference between WPMEMORYLIMIT and WPMAXMEMORYLIMIT?
WPMEMORYLIMIT controls frontend PHP memory allocation for visitor-facing pages. WPMAXMEMORYLIMIT controls the WordPress admin panel, WP-Cron tasks, and backend operations. Both are still capped by the server's php.ini memorylimit directive.
Can plugins cause WordPress memory exhausted errors?
Yes. Page builders like Elementor and Divi, WooCommerce with large catalogs, backup plugins, and security scanners like Wordfence are common causes. Install Query Monitor to identify which plugin consumes the most PHP memory per request.
Does PHP version affect WordPress memory usage?
PHP 8.x handles memory allocation more efficiently than PHP 7.x. Upgrading from PHP 7.4 to PHP 8.2 or 8.3 can reduce memory consumption by 10-30% depending on your active plugin stack and theme complexity.
What is the recommended memory limit for WooCommerce?
WooCommerce recommends a minimum of 256MB. Stores with over 1,000 products, multiple payment gateways, and active extensions typically need 512MB. Check WooCommerce system status under WooCommerce > Status for current memory readings.
Does shared hosting limit WordPress memory?
Shared hosting providers like Bluehost, Hostinger, and GoDaddy typically cap PHP memory between 64MB and 256MB. You share server resources with other sites. VPS and managed WordPress hosting from WP Engine or Kinsta offer higher configurable limits.
Does increasing WordPress memory limit slow down my site?
No. A higher memory limit does not mean PHP uses more RAM by default. It only raises the maximum allowed per request. PHP allocates what the script needs and releases the rest once execution finishes.
Conclusion
Managing your WordPress memory limit comes down to knowing two numbers: what WordPress requests and what your server actually allows through php.ini.
Start with wp-config.php. Set WPMEMORY_LIMIT` to 256M. If that does not stick, check your hosting provider's PHP configuration through cPanel, Plesk, or hPanel.
But do not stop there. Use Query Monitor to track which plugins and theme functions consume the most RAM per request. Deactivate what you do not need. Upgrade to PHP 8.x if you have not already.
If shared hosting keeps capping your resources, a VPS or managed host like Kinsta or WP Engine gives you full control over PHP-FPM pools, memory allocation, and server-level directives.
Fix the limit. Then fix the cause.


